1. Introduction
1.1. Definition
SWIM (Subventions Web Input Module) is the electronic system developed by the DG Employment, Social Affairs and Inclusion whose objective is to manage effectively its calls for proposals and the ensuing grant agreements.
At the grant application stage, SWIM allows the applicants to fill out and to submit the application form and the estimated budget.
During the action execution period, the beneficiary uses SWIM to:
§ create and submit budget amendment requests
§ create and submit participants amendment requests
§ create and submit declarations of costs already incurred to be joined to a request for further pre-financing/interim payments, if these payments are foreseen in the grant agreement.
After the action closing date, the beneficiary uses SWIM to submit the final financial statement as well as the final technical implementation report.
In order to be taken into consideration, those electronically submitted documents must also be printed, signed and sent to the Commission together with an official letter and the other documents specified in the call for proposals and/or the grant agreement.
The purpose of this manual is to describe the technical features and functionalities of SWIM and to enable thus users to create, edit and submit electronically the above mentioned documents.
|
Remark |
The legal and financial rules as well as the practical procedure to be respected are established in the call for proposals' documents and/or in the grant agreement. |
1.2. Disclaimer
The information contained in this manual is for guidance only and is a description on how to use the SWIM application. There can be no guarantees as to the accuracy of the descriptions due to the evolving nature of the system. In no way does this information replace the regulations or could be considered as a legal interpretation of the Commission services.
1.3. Using EU Login authentication
SWIM uses EU Login as unique authentication method. EU Login is the European Commission's user authentication service. It allows authorised users to access a wide range of Commission web services, using a single email address and password.
This section describes:
how to create a personal EU Login account
how to reset a forgotten EU Login password
|
******************** Important notice! As
the old authentication method based on the application number has been deactivated. ******************** |
1.3.1. Creating a personal EU Login account
Follow this procedure to create a personal EU Login account:
1. Go to the EU Login account creation screen by clicking here.
The following screen is displayed:
2. Fill out the fields as indicated above and click the Create an account button.
The following screen is displayed:
A confirmation email is sent to the mail box you indicated in the Create an account screen:
Dear xxx,
You have been registered in EU Login.
Your email address is xxx.yyy@gmail.com.
To create your password, follow the link below:
You have a maximum of 24 hr, starting from the time that this message was sent, to create your password, but you are encouraged to do so immediately if possible. After this time, you can make another request by following the same link: you will then need to re-enter your username and confirm your request.
If the above
link does not work, you can copy the following address (make sure the complete
address is copied!) and paste it into your browser's address bar:
https://webgate.ec.europa.eu/cas/init/initialisePasswordLogin.cgi?wayf.domain=external&wayf.remember=checked&wayf.submit=Select&uid=nracaang&resetCode=Nes7A7R7hA52LBKdTJ3oVDsxPKBCUIsJRg2AIt3oN9W
Instead of replying to this message, if you have a problem, please follow the help or contact information on the site where you were trying to register.
Note that it may take up to 5 minutes after reception of this mail before the above-mentioned site will recognize your registration.
Sent to you by EU Login
3. Click the link in the e-mail message above.
The New password screen is displayed:
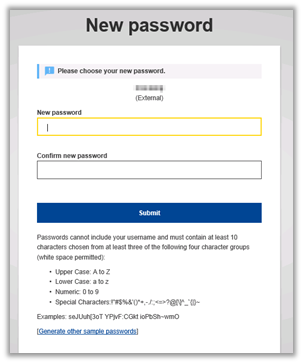
4. Choose and confirm your EU Login password and then click the Submit button.
The screen confirming the password change is displayed:
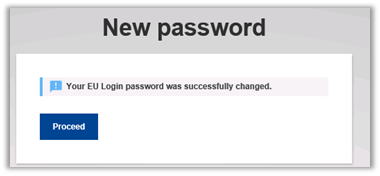
5. Click the Proceed button.
The Successful login screen is displayed:
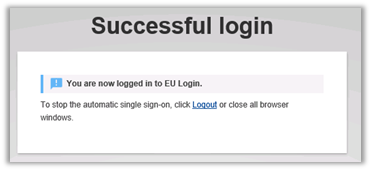
This screen confirms that you now dispose of a valid personal EU Login account. You can now close the browser session or click the Logout link.
1.3.2. Resetting a forgotten EU Login password
Follow this procedure to reset your EU Login password:
1. On the EU Login screen, click the link Lost your password?:

2. You will be asked to enter the security code displayed in the frame:

3. Enter the displayed code and click the Get a password button.
The following screen is displayed:

An email has been sent to your mailbox.
4. Go to your e-mail account and open the e-mail message entitled EU Login Password Initialisation.
Dear xxx,
You have requested a reset of your EU Login password. You can do this by
following the link below, preferably immediately - but a maximum of 24 hr after
this message was sent. You should therefore follow the link before 30/08/2017
17:05 GMT+02:00.
<https://webgate.ec.europa.eu/cas/init/initialisePasswordLogin.cgi?uid=nracaang&resetCode=XyiluZzZS3f2o2pyjLsPS51xzPrABCN2oQ4DNV2QXzI4&loginRequestId=ECAS_LR-5314863-495J2lDi9S5WoHTSkOBUnjIOBXLZXfdCj7zKsW6RvSiJWrCfvAolQO2M2mzI8WMd5Md3CVFftzGzIWDNY1jXjD0-Jj71zxYb8yrVTezQzffztHa-tVrpyTKN3HIPO24KELInFIpqnskJXnLGsyHEtYAk3Qe&service=https%3A%2F%2Fwebgate.ec.europa.eu%2Femployment_social%2Fdefis%2FdefisEvaluations%2Fcall%2Flist.do>
If you did not
make or authorise this request yourself, it may be due to a typing error by
another user. To cancel the request, please click here.
If the above mentioned link does not work, you can copy-paste it (without any
line break) in your browser address bar.
If this message was delayed or for some other reason you are unable to complete
the rest of the process within 24 hr, please return here to make another request.
If you suspect that someone else is trying to obtain or reset your password,
please report this to your local support desk.
Sent to you by EU Login automated password reset service
5. Click (or copy) the link in the e-mail message.
The New password screen is displayed:
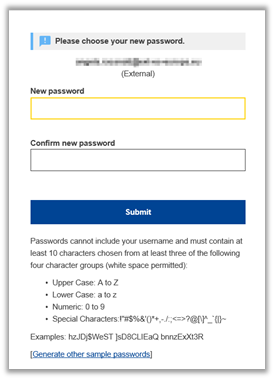
6. Enter and confirm your new password. Then click the Submit button.
The following screen is displayed:
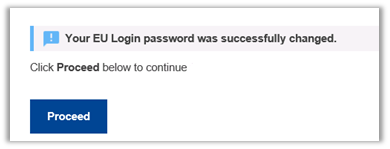
7. Click the Proceed button.
The Successful login screen is displayed.
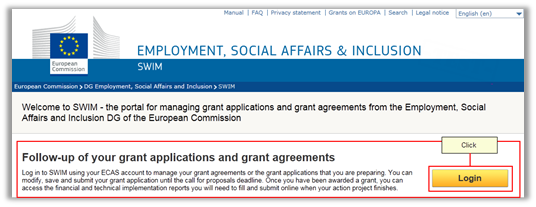
2. SWIM home page
Use the following URL to access the SWIM
home page:
https://webgate.ec.europa.eu/swim/external/displayWelcome.do
The SWIM home page is displayed:

The page contains the following links:
|
Link |
Description |
|
Manual |
Click this link to open the SWIM manual in PDF format |
|
FAQ |
Click this link to access a list of frequently asked questions about SWIM. |
|
Privacy statement |
Click this link to display a statement providing information on data protection procedures followed by European Commission services. |
|
Grants on EUROPA |
Click this link to open the European Commission's web page for Grants, Funds and Programs, organized by EU policy. |
|
Search |
Click this link to access the Search page of the European Commission's website (www.europa.eu). |
|
Legal notice |
Click this link to open the web page providing general information on data protection (disclaimer, copyright, personal data protection). |
|
Language |
Select another supported language from the drop-down list, if required. |
The page also contains the following main sections:
|
Section |
Description |
|
Follow-up of your grant applications and grant agreements |
Use this section to log in and to access the list of grant applications and grant agreements linked to your EU Login account. Refer to Following up on your grant applications and grant agreements. |
|
Current calls for proposals |
Use this section to create a new application for a current call for proposals. Refer to Creating a grant application for a current call for proposals. |
3. Creating a grant application for a current call for proposals
Note: SWIM uses EU Login as unique authentication method. You need a personal EU Login account in order to create a new grant application. If you do not have a personal EU Login account yet, please create one first. Refer to Creating a personal EU Login account.
1. Use the following URL to access the SWIM home page:
https://webgate.ec.europa.eu/swim/external/displayWelcome.do
2. On the SWIM home page, look for the required call in the section Current calls for proposals.
In the screenshot below, there are three current calls for proposals. In this example, we create an application for the third call:
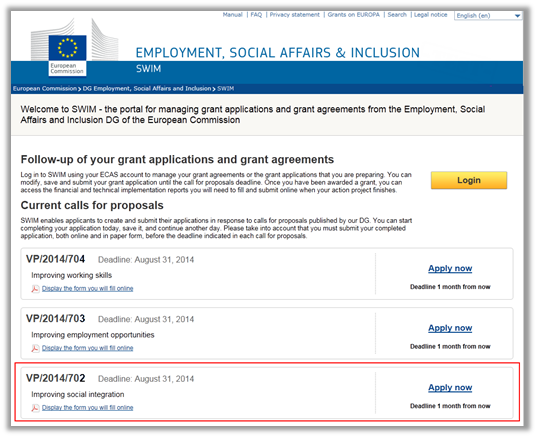
The following elements are available for each current call for proposals:
Call reference in VP/YYYY/XXX format, where YYYY is the year indication and XXX is a sequential number
Title of the call for proposals
Deadline for submitting applications, displayed as a date
Link Check the form you will fill online
Link Apply now
Deadline for submitting applications displayed as a number of days, weeks or months. This indication is displayed in red, if the submission deadline is very close.
3. If required, click the link Check the form you will fill online to open the form in PDF format in a separate browser window.
4. Click the Apply now link on the right to create a grant application for the required call for proposals.

The EU Login Authentication screen is displayed:
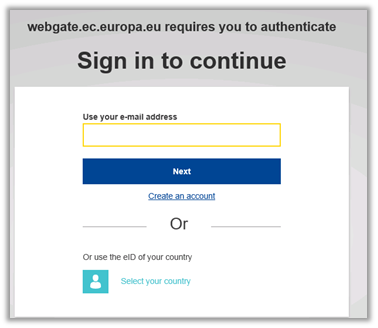
5. Enter your EU Login e-mail address and your EU Login password (after clicking on the Next button).
Notes:
If you do not have an EU Login account yet, please create it first. Refer to Creating a personal EU Login account.
If you dispose of an EU Login account, but forgot your password, refer to Resetting a forgotten EU Login password.
The New grant application screen is displayed:
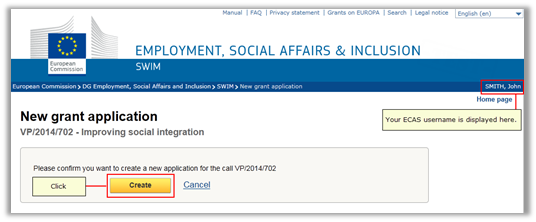
6. Click the Create button.
The Application created screen is displayed:
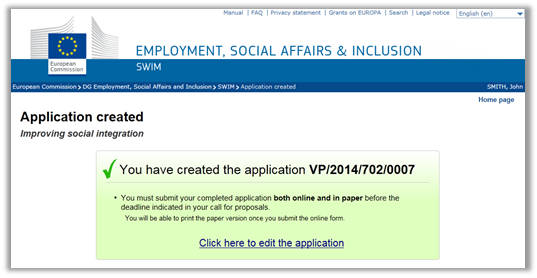
7. Click the link Click here to edit the application.
A blank Application form is displayed for your new application:
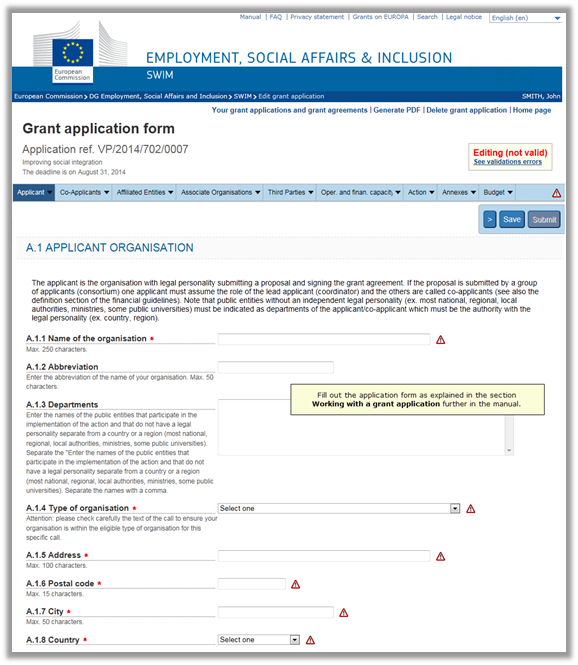
The procedure to complete this form is explained in section Working with your grant applications.
4. Following up on your grant applications and grant agreements
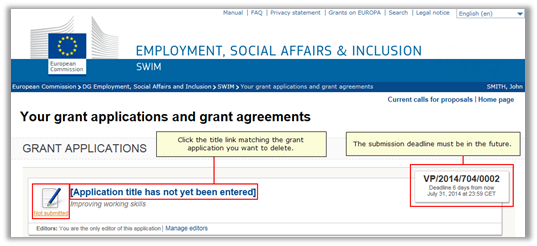
To follow up on your grant applications and grant applications, you must log into SWIM and access the list of grant applications and grant agreements linked to your EU Login account. From that list, you can select a grant application or grant agreement and start working with it.
4.1. Accessing the list of your grant applications and grant agreements
Follow this procedure to access the list of grants and applications assigned to your EU Login account.
1. Use the following URL to access the SWIM home page:
https://webgate.ec.europa.eu/swim/external/displayWelcome.do
2. Click the Login button in the section Follow-up of your grant applications and grant agreements.
The EU Login Authentication screen is displayed:
3. Enter your EU Login e-mail address and your EU Login password (after clicking on the Next button).
Notes:
If you do not have an EU Login account yet, please create it first. Refer to Creating a personal EU Login account.
The screen Your grant applications and grant agreements is displayed:
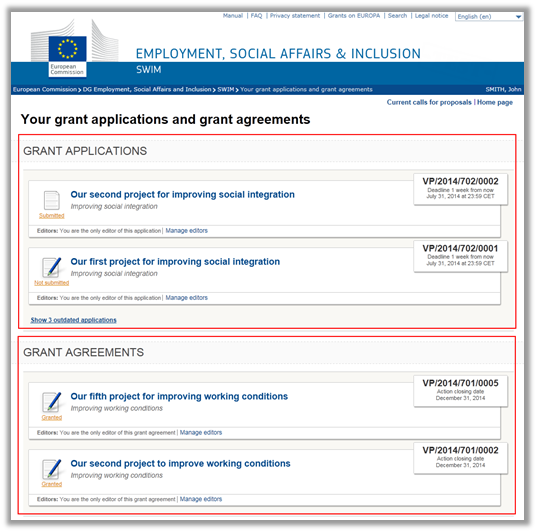
It contains two sections:
Grant applications assigned to your EU Login account
Grant agreements to your EU Login account
For each grant application or grant agreement, the following elements are listed:
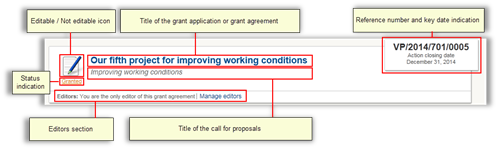
The following table describes these elements:
|
Element |
Description |
|
Status indication |
Refer to the detailed sections below for an overview of the different status indications. |
|
Editable/Not editable icon |
If the grant application or grant agreement is editable, the following icon is displayed:
If the grant application or grant agreement is not editable, the following icon is displayed:
|
|
Title of the grant application or grant agreement |
The title of the grant application or grant agreement is displayed as a link. Click this link to start working with the grant application or grant agreement. |
|
Title of the call for proposals |
The title of the call for proposals is displayed in italics. |
|
Grant application or grant agreement reference number |
The grant application or grant agreement reference number has always the following format: VP/YYYY/CCC/XXXX, where: · YYYY = the indication of the year · CCC = the indication of the call for proposals · XXXX = the sequential number of the application |
|
Key date indication |
The key date is an important date in the lifecycle of the grant application or grant agreement. |
|
Editors section |
This section allows managing the editors linked to this grant application or grant agreement. For a detailed description, refer to Managing editors. |
The following sections provide a detailed description of the grant applications and grant agreements sections.
4.2. Grant applications section
This section focuses on the Grant applications section in the screen Your grant applications and grant agreements:
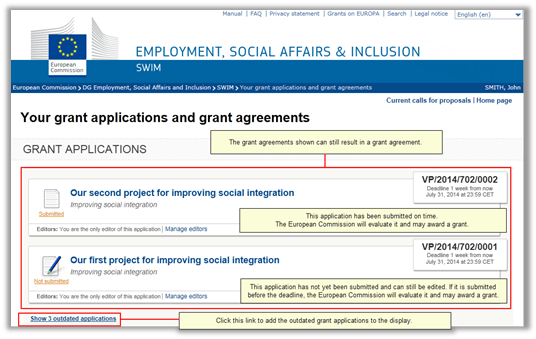
Description:
By default, only the applications that can still result in a grant agreement are displayed.
The following status indications are possible:
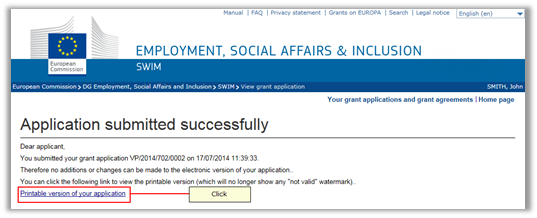
Submitted: The application was submitted before the submission deadline, but the European Commission did not yet decide whether a grant will be awarded or not. In the screenshot above, VP/2014/702/0002 is an example of a submitted application. You may click the title link to display the Application submitted successfully screen:
 Apart from printing again
the application form you submitted, you cannot perform any action for this grant
application, until the European Commission decided to award a grant or not. You
may click the link Your grant applications and grant agreements
to return to the previous screen.
Apart from printing again
the application form you submitted, you cannot perform any action for this grant
application, until the European Commission decided to award a grant or not. You
may click the link Your grant applications and grant agreements
to return to the previous screen.
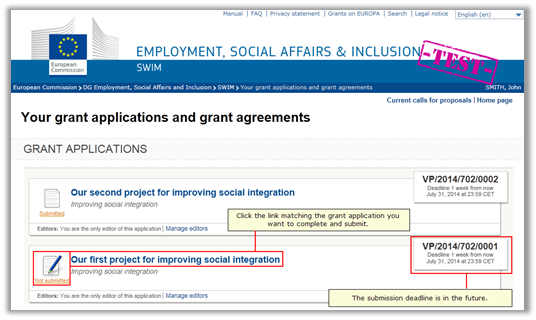
Not submitted: The
application has not yet been submitted (example: VP/2014/702/0001
in the screenshot above). You may click the title link to access the Grant application form, in order to fill it out and submit
it before the submission deadline:
Refer to Completing and submitting a grant application
for a detailed description.
You may click the link Your grant applications and grant agreements
to return to the previous screen.
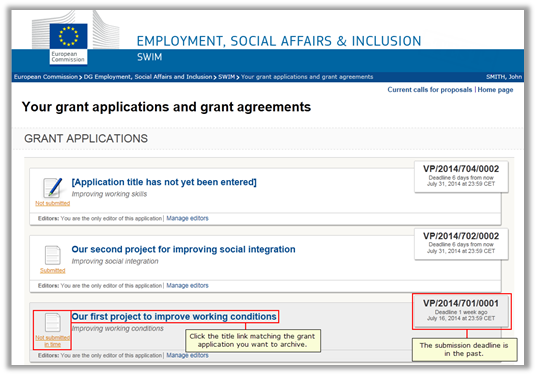
4. Click the link Show outdated applications.
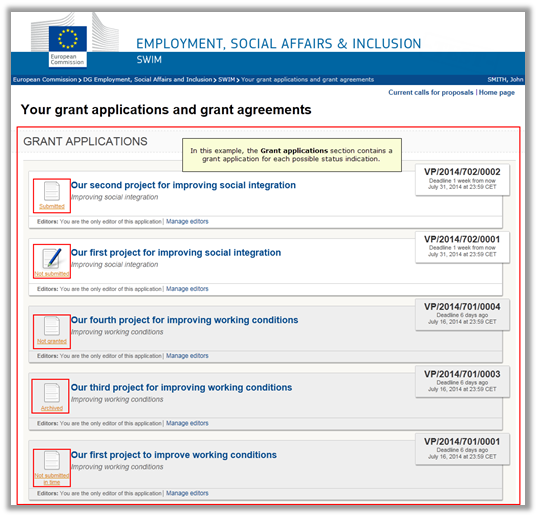
The applications assigned to your EU Login account, which can no longer result in a grant agreement, are added to the Grant applications section:
 The following status
indications are possible for the outdated applications:
The following status
indications are possible for the outdated applications:
Not granted: The grant
application has been submitted before the submission deadline, but the European
Commission decided not to award a grant. In the screenshot above, VP/2014/701/0004 is an example of an application not
selected for granting. If you click the title link, the Application
submitted successfully page will be displayed:

You can print the application form or click the link Your
grant applications and grant agreements to return to the previous
screen.
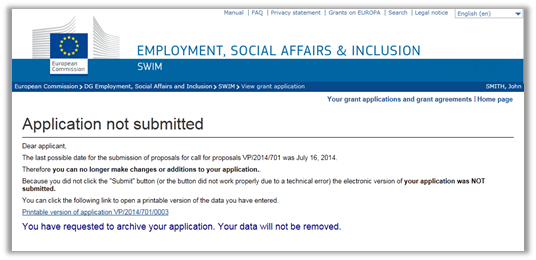
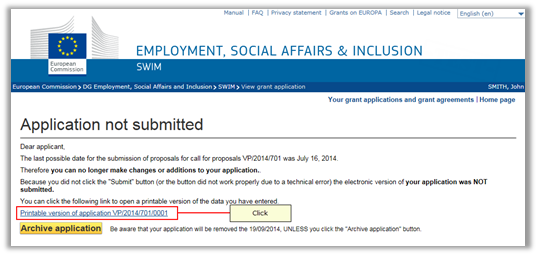
Not submitted in time: The grant
application was not submitted before the submission deadline. In the screenshot
above, VP/2014/701/0001 is an example of a grant
application that was not submitted in time. The European Commission will
therefore not consider it for a grant. When you click the title link, the
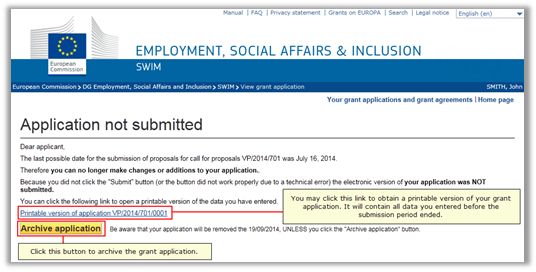
following screen is displayed:
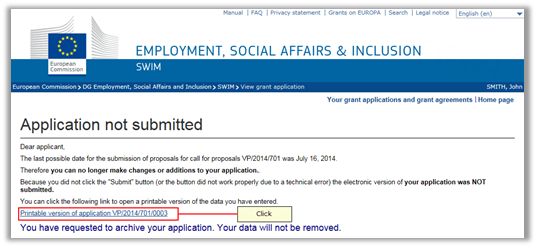
 Applications
that were not submitted in time remain on the system for a limited period only.
They will be removed automatically, unless the applicant requests them to be
archived. Refer to Archiving a
grant application. You can archive the application, print the application
form or click the link Your grant applications and grant agreements
to return to the previous screen.
Applications
that were not submitted in time remain on the system for a limited period only.
They will be removed automatically, unless the applicant requests them to be
archived. Refer to Archiving a
grant application. You can archive the application, print the application
form or click the link Your grant applications and grant agreements
to return to the previous screen.
Archived: The application has not been submitted before the submission deadline and has therefore not been considered by the Commission. The applicant has requested to archive the data. The application will therefore not be deleted from the system. In the screenshot above, VP/201/701/0001 is an example of an archived application.
When you click the
title link, the following screen is displayed:
 You can print the
application form or click the link Your grant applications
and grant agreements to return to the previous screen.
You can print the
application form or click the link Your grant applications
and grant agreements to return to the previous screen.
4.3. Grant agreements section
This section contains all grant agreements assigned to your EU Login account:
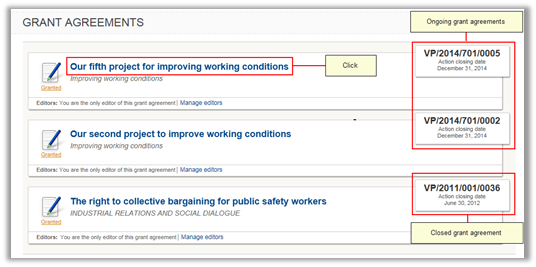
The status indication is always Granted.
Click a title link to access the Grant agreement follow-up page for the matching grant agreement:
The grant agreement state determines which options are available in this screen. Refer to the procedures in Working with your grant agreements.
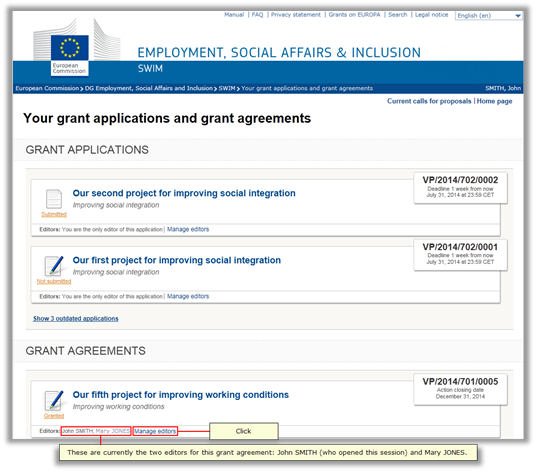
4.4. Managing editors
An editor is a person whose EU Login account has been linked to a grant application or grant agreement in SWIM. The person who creates an application is the first editor of that grant application and the resulting grant agreement. He/she has access to the Application form for the grant application and to the Grant agreement follow-up page for the resulting grant agreement.
Furthermore, this initial editor can send an e-mail message to other persons inviting them to become an editor of the grant application or grant agreement as well. If the other person accepts, he or she will have the same edit rights as the original editor to perform actions for the grant application or grant agreement. (He or she can even invite additional editors or remove existing editors.)
This section describes:
How an editor can send e-mail messages inviting additional people to become an editor
How a person can accept (or reject) such an invitation
How an editor can be removed from a grant application or grant agreement
4.4.1. Inviting people to become an editor for a specific grant application or grant agreement
Perform this procedure if you want to invite other people to become editor of a grant application or agreement for which you are an editor yourself:
1. Access the list of your grant applications and grant agreements.
Refer to Accessing the list of your grant applications and grant applications.
The list of Your grant applications and grant agreements is displayed:
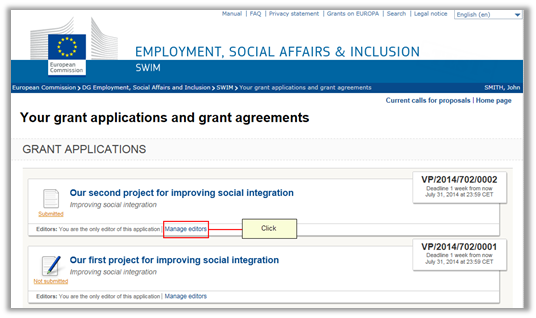
2. Click the link Manage editors for the grant application or grant agreement for which you want to invite other people as editor.
The following screen is displayed:
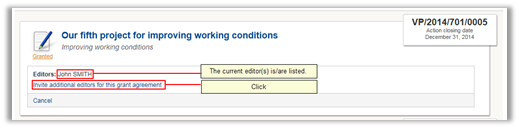
3. Click the link Invite additional editors for the application.
The following screen is displayed:
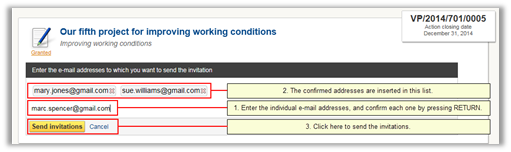
4. Enter the e-mail addresses and click the button Send invitations.
The following message is displayed:
![]()
5. You may now click the link Manage editors again.
The following screen is displayed:
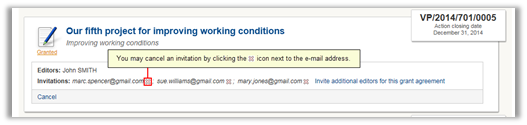
You may cancel one or more invitations by clicking the icon, as shown above.
4.4.2. Accepting (or rejecting) an invitation to become an editor for a specific grant application or grant agreement
If you are invited to become an editor of an existing grant application or grant agreement, you will receive an e-mail message with the subject Invitation to become an editor in SWIM. This e-mail message contains the following text:
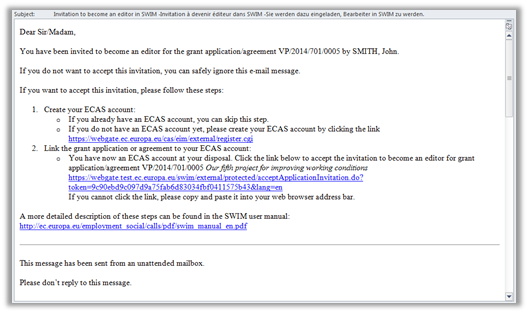
These instructions are explained below.
1. Create an EU Login account, if required.
Click the link https://webgate.ec.europa.eu/cas/eim/external/register.cgi, and follow the instructions. For a detailed description, refer to Creating a personal EU Login account.
2. Click the link in step 2 and provide your EU Login email address and password.
The following screen is displayed:
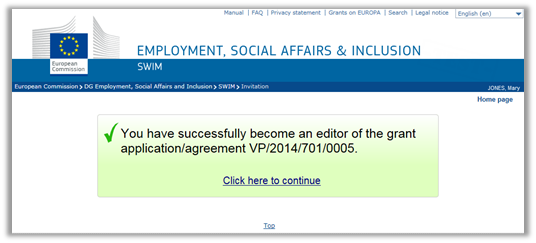
3. Click the link Click here to continue.
The list of your grant applications and grant agreements is displayed. The grant application or grant agreement, for which you have accepted to become an editor, is listed:
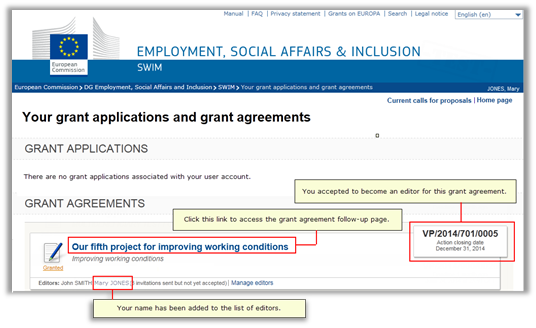
In the screenshot above, you have become an editor of a grant agreement.
4. You may now click the title link to access the grant agreement follow-up page (or grant application form) and to start your work.
Refer to the following sections:
Working with your grant applications
Working with your grant agreements
4.4.3. Removing editors from a grant application or grant agreement
Perform this procedure if you want to remove editors from a grant application or a grant agreement for which you are an editor yourself:
1. Access the list of your grant applications and grant agreements.
Refer to Accessing the list of your grant applications and grant agreements.
The list of Your grant applications and grant agreements is displayed:
2. Click the link Manage editors for the grant application or grant agreement for which you want to remove editors.
The following screen is displayed:

3. Click the ![]() icon
next to the user you want to remove as editor for this application.
icon
next to the user you want to remove as editor for this application.
The following confirmation is displayed:
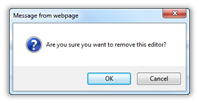
4. Click OK to confirm.
Notes:
You may remove your own user name from the list of editors. As a result, the grant application or agreement will disappear from the list.
However, it is not possible to remove your own user name, if you are the only editor listed for the grant application or grant agreement.
5. Working with your grant applications
You can only perform actions to the grant applications that are assigned to your EU Login account, i.e. for which you are an editor. These applications are available in the Grant applications section of the list of Your grant applications and grant agreements. Refer to Accessing the list of your grant applications and grant agreements.
The Grants applications section in the list of Your grant applications and grant agreements may look as follows:
The actions you can perform on a listed grant application depend on the grant application status:
|
Grant application status |
Description and available actions |
|
|
A grant application has the status Submitted, if it is linked to a current or closed call for proposals and the European Commission did not take a decision yet to award a grant or not. You can perform the following action for your grant applications with the Submitted status indication: Refer to the detailed section below. |
|
|
A grant application has the status Not submitted, if it is linked to a current (ongoing) call for proposals and it has not yet been submitted. You can perform the following actions for your grant applications with the Not submitted status indication: · Complete and submit the grant application · Delete the grant application Refer to the detailed sections below. |
|
|
A grant application has the status Not granted, if it was correctly submitted and the European Commission decided not to award a grant. You can perform the following action for your grant applications with the Not granted status indication: Refer to the detailed section below. |
|
|
A grant application has the status Archived, if it was archived by one of the editors. You can perform the following action for your grant applications with the Archived status indication: Refer to the detailed section below. |
|
|
A grant application has the status Not submitted in time, if it is linked to a closed call for proposals and it was not submitted before the submission deadline. You can perform the following actions for your grant applications with the Not submitted in time status indication: · Archive the grant application Refer to the detailed sections below. |
5.1. Completing and submitting a grant application
A grant application can be completed and submitted, if it has the Not submitted status. Follow this procedure to complete and submit such a grant application:
1. Access the list of your grant applications and grant agreements.
Refer to Accessing the list of your grant applications and grant agreements.
The list of Your grant applications and grant agreements is displayed:
Notes:
If the application you are looking for is not available, you can add it to your list by asking a current editor to invite you as an editor as well, refer to Managing editors.
If the application does not yet exist, you must create it first. Refer to Creating a grant application for a current call for proposals.
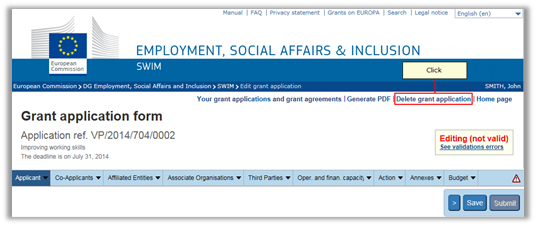
2. Click the title link of the required application.
The application form is displayed:

3. Verify the available elements.
The following elements are available:
Links:
Your grant applications and grant agreements: Click this link to return to the list of Your grant applications and grant agreements.
Generate PDF: Click this link to obtain a PDF version of the application form with the current settings.
Delete grant application: Click this link to delete the current application. Refer to Deleting a grant application.
Home page: Click this link to return to the SWIM home page.
Grant application and call for proposals details: This section contains the grant application reference (VP/YYYY/CCC/XXXX), the call for proposals title and the application submission deadline.
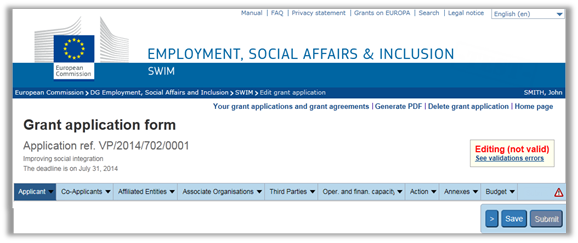
Grant application status indication: This section displays the current status of the application. This can either be:
Editing (not valid): The grant application form contains errors or is missing information. Click the link See validation errors to display the errors that are preventing your grant application from being valid.
Editing (valid): The grant application can be submitted because all mandatory fields have been filled out.
Main sections: The main sections are displayed on the navigation bar. You may click a main section to display the subsections that belong to it.
Subsection: By default, the first subsection (Applicant organisation) of the first main section (Applicant) is displayed. The subsections contain mandatory and optional text fields as well as drop-down lists. They can be filled out by the applicant with information regarding their proposed project in order to submit their grant application.
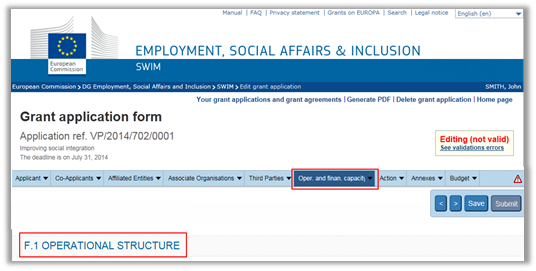
4. Use the navigation bar to select the main section and subsection you want to fill out.
In the following screenshot, the Operational structure subsection from the Operational and financial capacity main section is selected:
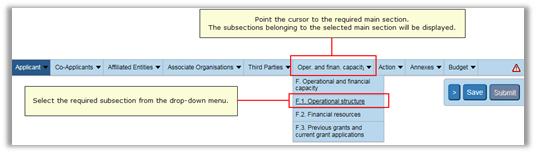
The application form displays the selected main section and subsection:
5. Fill out the subsections as required:
Fill out mandatory fields (marked by the red asterisk).
Fill out optional fields (not marked by the red asterisk) if you dispose of relevant information.
Select one of the predefined entries from the available drop-down lists.
6. Save your application form regularly using the buttons on the right of the navigation bar.
The following buttons are available:
![]()
Click ![]() to save the current form data and
return to the previous main section
to save the current form data and
return to the previous main section
Click ![]() to save the current form data and go
to the next title.
to save the current form data and go
to the next title.
Click ![]() to save the current form data and
remain on the current main section
to save the current form data and
remain on the current main section
The Submit button will become active, if the form has been completely filled out.
Note:
Do not use the navigation buttons of your browser, as this action will disconnect you from SWIM and you will lose all data you had already entered in your application form.
7. Complete all main sections and subsections as required.
A more detailed description can be found in the following sections:
Co-Applicants (optional, may not be available for all calls for proposals)
Affiliated Entities (optional, may not be available for all calls for proposals)
Associate Organisations (optional, may not be available for all calls for proposals)
Third Parties (optional, may not be available for all calls for proposals)
Operational and financial capacity
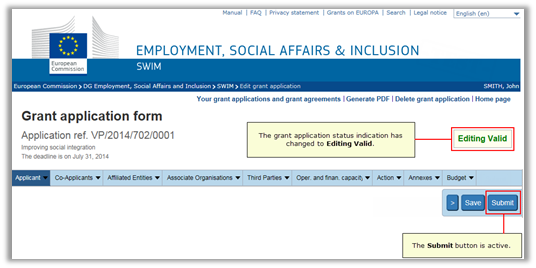
Once all sections of the SWIM application form have been properly completed, the grant application status on the top left side of the screen changes to In edition (Valid), meaning the application form can be submitted, and the button Submit is active:
Note:
The status indication remains Not valid, if you did not fill out one or more mandatory fields and/or if the budget you defined is not valid. In this case the link See validation errors is available at the top of the screen:
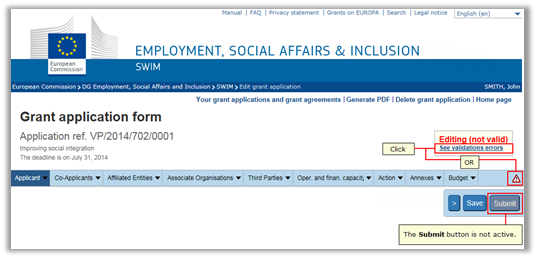
Click this link to display the validation errors:
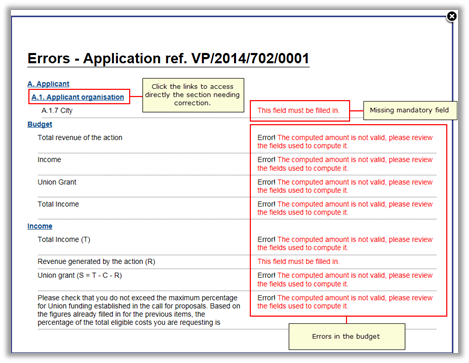
You may click the required link to directly access the section needing correction.
8. Once you are sure that your application is complete and you do not want to perform any more changes, click the Submit button.
The Submit grant application screen is displayed:
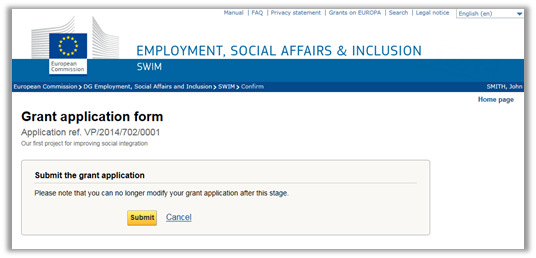
9. Click the Submit button.
The screen Grant application submitted successfully is displayed:
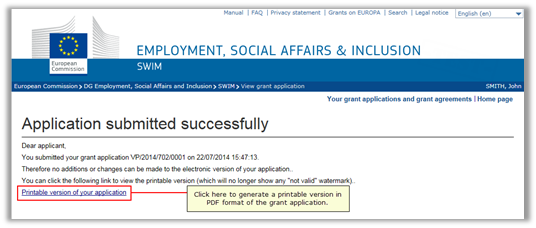
Important:
After being submitted electronically, the grant application form must also be printed out, signed and sent by post to the responsible unit, as specified in the Call for Proposals.
10. Click the link Printable version of your grant application.
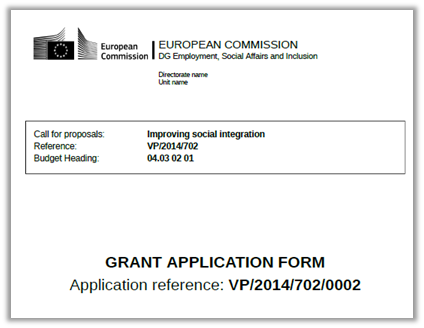
The PDF version of your completed grant application form will be opened in a separate browser window. The first page of the print-out looks as follows:
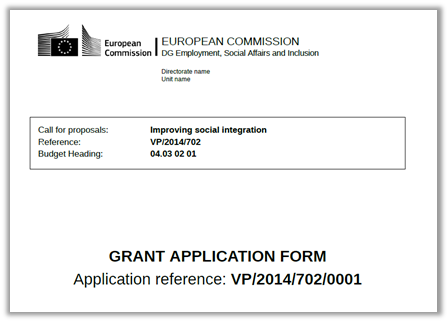
11. Perform following actions outside SWIM:
Save this file on your local system.
Print the file.
Fill out the Signature section on the paper version.
The signature section looks as follows:
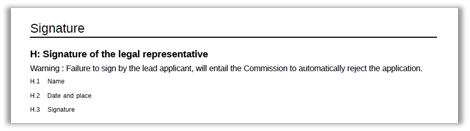
Send it to the address you find in the text of the Call for Proposals.
This concludes the general procedure to fill out and submit an application.
5.2. Detailed section descriptions
Refer to the sections below for a detailed description of the different main sections of the application form. The following main sections can be available:
Co-Applicants (optional, may not be available for all calls for proposals)
Affiliated Entities (optional, may not be available for all calls for proposals)
Associate Organisations (optional, may not be available for all calls for proposals)
Third Parties (optional, may not be available for all calls for proposals)
Operational and financial capacity
5.2.1. Applicant
The tables below provide an overview of the subsections and fields available on the Applicant main section.
Applicant Organisation subsection
|
Field |
Description/Remarks |
M.L. |
|
Name of the organisation |
Fill out the name of your organisation |
250 |
|
Abbreviation |
This abbreviation will be used in other main sections |
50 |
|
Departments |
Enter the names of the public entities that participate in the implementation of the action and that do not have a legal personality separate from a country or a region (most national, regional, local authorities, ministries, some public universities). In case of several departments, click 'Add Department' button and enter one department for each line. A department can be removed by deleting the relative line. |
300 |
|
Type of organisation |
Select an entry from the pre-defined drop-down list. |
- |
|
Address |
Enter your organisation's street address and number |
100 |
|
Postal code |
Enter the postal code. |
15 |
|
City |
Enter the city name. |
50 |
|
Country |
Select an entry from the pre-defined drop-down list. If a country is missing, organisations from that country are not eligible for the call for proposals. |
- |
|
Telephone |
Be sure to include the national prefix, e.g. +32 for Belgium. |
30 |
|
Fax |
Contrary to previous SWIM versions, this field is no longer mandatory. |
30 |
|
E-mail address |
Enter a valid e-mail address |
100 |
|
Registration number |
Enter your organisation's registration number. |
40 |
|
VAT number |
Enter your organisation's VAT number. |
15 |
|
Web site |
Be sure to include the references http:// or https:// The content of this field will be displayed as link in our systems. Please be sure that it points to a real website. |
100 |
|
Legal entity form |
It is required to fill out the Legal entity form for the applicant organisation. If the field is mandatory (marked with the red asterisk), you should scan the completed form and upload it into the system. |
- |
|
Financial identification form |
It is required to fill out the Financial identification form for the applicant organisation. If the field is mandatory (marked with the red asterisk), you should scan the completed form and upload it into the system. |
- |
|
Declaration on honour |
It is required to fill out the Declaration on honour for the applicant organisation. If the field is mandatory (marked with the red asterisk), you should scan the completed form and upload it into the system. |
- |
|
3 supplementary spaces for additional documents |
Only one file can be uploaded. In case you have several annexes, include them in a Zip file and upload it by using the Browse button. |
- |
(M.L. = max. length as number of characters)
Legal Representative subsection
|
Field |
Remarks |
M.L. |
|
Title |
Select the required entry from the drop-down list. |
- |
|
Surname |
Enter the surname of your organisation's legal representative. |
100 |
|
Forename |
Enter the forename of your organisation's legal representative. |
50 |
|
Gender |
Select the required entry from the drop-down list. |
- |
|
Function |
Select the required entry from the drop-down list. If you do not find the required function, select the entry Other |
- |
|
Other function |
Enter the function, if you could not find it in the Function drop-down list. |
100 |
|
Telephone |
Be sure to include the national prefix, e.g. +32 for Belgium. |
30 |
|
Fax |
Contrary to previous SWIM versions, this field is no longer mandatory. |
30 |
|
E-mail address |
Enter the e-mail address of your organisation's legal representative. |
100 |
(M.L. = max. length as number of characters)
Person responsible for managing the action subsection
|
Field |
Remarks |
M.L. |
|
Title |
Select the required entry from the drop-down list. |
- |
|
Surname |
Enter the surname of the person responsible for managing the action. |
100 |
|
Forename |
Enter the forename of the person responsible for managing the action. |
50 |
|
Gender |
Select the required entry from the drop-down list. |
- |
|
Function |
Select the required entry from the drop-down list. If you do not find the required function, select the entry Other |
- |
|
Other function |
Enter the function, if you could not find it in the Function drop-down list. |
100 |
|
Telephone |
Be sure to include the national prefix, e.g. +32 for Belgium. |
30 |
|
Fax |
Contrary to previous SWIM versions, this field is no longer mandatory. |
30 |
|
E-mail address |
Enter the e-mail address of the person responsible for managing the action. |
100 |
(M.L. = max. length as number of characters)
5.2.2. Co-Applicants
In the Co-Applicants
main section, the applicant must provide information regarding the co‑applicants
involved in the project.
Note: If a call for proposals does not allow the
definition of co-applicants, the Co-Applicants main
section will be missing on the navigation bar.
Follow the procedure below to add a new co‑applicant:
1. Access the Co-Applicants main section.
2. Click the button Add a new co-applicant to display the co-applicant definition fields:
The table below provides an overview of the available co-applicant definition fields:
|
Field |
Remarks |
M.L. |
|
Name of the organisation |
Enter the co-applicant's organisation name. |
250 |
|
Abbreviation |
If provided, this abbreviation will be used on other main sections. |
50 |
|
Departments |
Enter the names of the public entities that participate in the implementation of the action and that do not have a legal personality separate from a country or a region (most national, regional, local authorities, ministries, some public universities). In case of several departments, click 'Add Department' button and enter one department for each line. A department can be removed by deleting the relative line. |
300 |
|
Type of organisation |
Select an entry from the pre-defined drop-down list. |
- |
|
Address |
Enter the co-applicant's street address and number. |
100 |
|
Postal code |
Enter the co-applicant's postal code. |
15 |
|
City |
Enter the co-applicant's city. |
50 |
|
Country |
Select an entry from the pre-defined drop-down list. If a country is missing, organisations from that country are not eligible as co-applicant for the call for proposals. |
- |
|
Telephone |
Be sure to include the national prefix, e.g. +32 for Belgium. |
30 |
|
Fax |
Contrary to previous SWIM versions, this field is no longer mandatory. |
30 |
|
E-mail address |
Enter the co-applicant's e-mail address. |
100 |
|
Registration number |
Enter the co-applicant's registration number. |
40 |
|
VAT number |
Enter the co-applicant's VAT number |
15 |
|
Web site |
Be sure to include the references http:// or https:// The content of this field will be displayed as link in our systems. Please be sure that it points to a real website. |
100 |
|
Legal entity form |
It is required to fill out the Legal entity form for the co-applicant organisation. If the field is mandatory (marked with the red asterisk), you should scan the completed form and upload it into the system. |
|
|
Mandate |
It is required to fill out the Mandate for the co-applicant organisation. If the field is mandatory (marked with the red asterisk), you should scan the completed form and upload it into the system. |
- |
|
Declaration on honour |
It is required to fill out the Declaration on honour for the co-applicant organisation. If the field is mandatory (marked with the red asterisk), you should scan the completed form and upload it into the system. |
- |
|
Letters of commitment |
It is required to fill out the Letter of commitment for the co-applicant organisation. If the field is mandatory (marked with the red asterisk), you should scan the completed form and upload it into the system. |
- |
|
3 supplementary spaces for additional documents |
Only one file can be uploaded. In case you have several annexes, include them in a Zip file and upload it by using the Browse button. |
- |
(M.L. = max. length as number of characters)
3. Fill out the fields as required and click the Save button.
4. Click the button Add a new co-applicant to declare an additional co-applicant and repeat these steps for all co-applicants to be added.
5. If required, use the Edit link to edit an existing co-applicant or the Delete button to delete it:

5.2.3. Affiliated Entities
In the Affiliated Entities main section, the applicant must provide information regarding the entities affiliated to the applicant organisation or to one of the co-applicants, and involved in the project.
Note: If a call for proposals does not allow the definition of affiliated entities, the Affiliated Entities main section will be missing on the Navigation bar.
Follow the procedure below to add a new affiliated entity:
1. Access the Affiliated Entities main section and click the button Add new affiliated entity.
The parent organisations drop-down list is displayed:

The drop-down list contains the names (or abbreviations when defined) of the applicant and co-applicant organisations.
2. Select the required parent organisation and click the Add button.
The affiliated entity definition fields are displayed:

The table below provides an overview of the available affiliated entity definition fields:
|
Field |
Remarks |
M.L. |
|
Parent organisation |
This field contains the name (or abbreviation) of the selected parent organisation. You may select however another entry from the drop-down list, if required. |
- |
|
Name of the affiliated entity |
Enter the name of the affiliated entity. |
250 |
|
Legal or capital link with the parent organisation |
It is required to provide a document demonstrating the legal or capital link to the parent organisation. If the field is mandatory (marked with the red asterisk), you should upload the document into the system. |
- |
|
Letters of commitment |
It is required to fill out the Letter of commitment for the affiliated entity. If the field is mandatory (marked with the red asterisk), you should scan the completed form and upload it into the system. |
- |
(M.L. = max. length as number of characters)
3. Fill out the fields as required and click the Save button.
4. Click the button Add a new affiliated entity to declare an additional affiliated entity and repeat these steps for all affiliated entities to be added.
5. If required, use the Edit link to edit an existing affiliated entity or the Delete button to delete it:

5.2.4. Associate Organisations
In the Associate Organisations main section, the applicant must provide information regarding the associate organisations involved in the action. Associate organisations participate in the action on a no-cost basis. They are not considered to be participants to a grant agreement concluded with the European Commission.
Note: If a call for proposals does not allow the definition of associate organisations, the Associate Organisations main section will be missing on the navigation bar.
Follow the procedure below to add a new associate organisation:
1. Access the Associate Organisations main section and click the button Add new associate organisation.
The associate organisation definition fields are displayed:
The table below provides an overview of the available associate organisation definition fields:
|
Field |
Remarks |
M.L. |
|
Name of the organisation |
Enter the name of the associate organisation. |
250 |
|
Abbreviation |
If provided, this abbreviation will be used on other main sections. |
50 |
|
Type of organisation |
Select an entry from the pre-defined drop-down list. |
- |
|
Address |
Enter the street address and number of the associate organisation |
100 |
|
Postal code |
Enter the postal code of the associate organisation. |
15 |
|
City |
Enter the city of the associate organisation. |
50 |
|
Country |
Select an entry from the pre-defined drop-down list. If a country is missing, organisations from that country are not eligible as associate organisations for the call for proposals. |
- |
|
Letters of commitment |
It is required to fill out the Letter of commitment for the associate organisation. If the field is mandatory (marked with the red asterisk), you should scan the completed form and upload it into the system. |
- |
(M.L. = max. length as number of characters)
2. Fill out the fields as required and click the Save button.
3. Click the button Add a new associate organisation to declare an additional associate organisation and repeat these steps for all associate organisations to be added.
4. If required, use the Edit link to edit an existing associate organisation or the Delete button to delete it:
5.2.5. Third Parties
In the Third Parties main section, the applicant must provide information regarding the third parties involved in the action. Third parties are entities other than beneficiaries, affiliated entities and associate organisations, which provide a cash contribution to the implementation of the action, but are not actively involved in it.
Note: They are not considered to be participants to a grant agreement concluded with the European Commission and they will not be part of any amendment process.
Follow the procedure below to add a new third party:
1. Access the Third Parties main section and click the button Add new third party.
The third party definition fields are displayed:
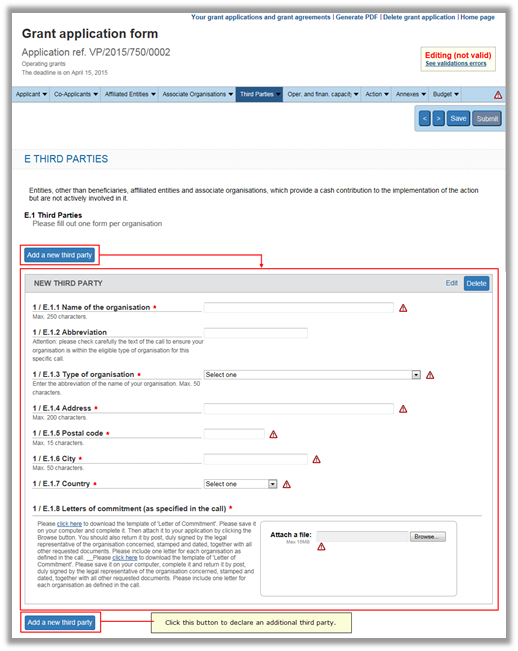
The table below provides an overview of the available third party definition fields:
|
Field |
Remarks |
M.L. |
|
Name of the organisation |
Enter the name of the third party. |
250 |
|
Abbreviation |
If provided, this abbreviation will be used on other main sections. |
50 |
|
Type of organisation |
Select an entry from the pre-defined drop-down list. |
- |
|
Address |
Enter the street address and number of the third party. |
100 |
|
Postal code |
Enter the postal code of the third party. |
15 |
|
City |
Enter the city of the third party. |
50 |
|
Country |
Select an entry from the pre-defined drop-down list. If a country is missing, organisations from that country are not eligible as third parties for the call for proposals. |
- |
|
Letters of commitment |
It is required to fill out the Letter of commitment for the third party. If the field is mandatory (marked with the red asterisk), you should scan the completed form and upload it into the system. |
- |
(M.L. = max. length as number of characters)
2. Fill out the fields as required and click the Save button.
3. Click the button Add a new third party to declare an additional third party and repeat these steps for all third parties to be added.
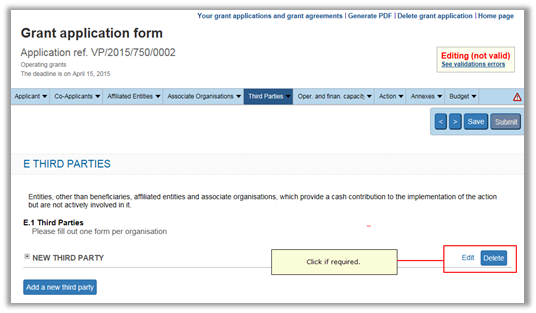
4. If required, use the Edit link to edit an existing third party or the Delete button to delete it:
5.2.6. Operational and financial capacity
In the main section Operational and financial capacity, the applicant must provide the details of the applicant and co-applicant organisations. The tables below provide an overview of the subsections and fields available on this main section.
Operational structure
|
Field |
Remarks |
M.L. |
|
Main objectives and activities |
Provide information about the main objectives and activities of the applicant and co-applicant organisations. |
10000 |
|
Administrative structure of each applicant organisation |
Provide information about the administrative structure of the applicant and co-applicant organisations. |
10000 |
|
Members of each applicant organisation |
Provide information about the members of the applicant and co-applicant organisations. |
10000 |
|
Staff employed by each applicant organisation in the relevant field |
Provide information about the members of the applicant and co-applicant organisations. |
10000 |
|
Experience of similar projects |
Provide information about the experience of similar projects for the applicant and co-applicant organisations. |
10000 |
(M.L. = max. length as number of characters)
Financial resources
|
Field |
Remarks |
M.L. |
|
Usual sources of finance of each applicant organisation |
Provide information about the usual sources of finance for the applicant and co-applicant organisations. |
10000 |
|
Turnover or equivalent for the last financial year of each applicant organisation |
Provide information about the turnover or equivalent for the last financial year for the applicant and co-applicant organisations. |
10000 |
|
Any other information demonstrating financial capacity |
You may provide other information demonstrating the financial capacity of the applicant and/or co-applicant organisations. |
10000 |
(M.L. = max. length as number of characters)
Previous grants and current grant applications
This subsection contains three tables allowing the declaration of previous grants, current action grant applications and current operating grants:
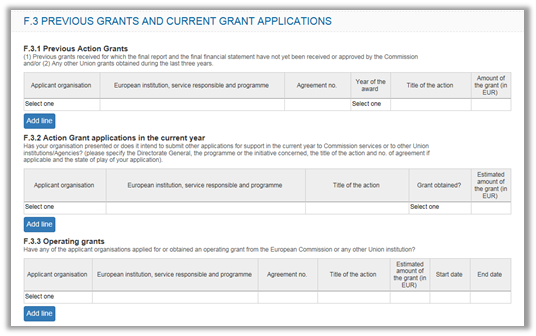
Previous Action Grants
Follow this procedure do declare previous action grants:
1. Access the Previous Action Grants table.
By default the table contains one empty line:
 The following table lists the available
fields:
The following table lists the available
fields:
|
Field |
Remarks |
M.L. |
|
Applicant organisation |
Select the required Applicant or Co-Applicant organisation name (or abbreviation) from the drop-down list. |
- |
|
European institution, service responsible and programme |
Enter the name of the responsible service and programme related to the action grant |
100 |
|
Agreement number |
Enter the agreement number linked to the action grant. |
50 |
|
Year of the award |
Select the year of the action grant from the drop-down list. |
- |
|
Title of the action |
Enter the title of the action linked to the action grant. |
250 |
|
Amount of the grant (in EUR) |
Enter the amount of the action grant (amount between 1 and 10 000 000 euro). |
- |
(M.L. = max. length as number of characters)
2. Fill out the fields as required and click the Save button.
The line may now look as follows:

3. If required, click the Add new line button to declare an additional previous grant.
4. Repeat this procedure, until you have declared all previous action grants as required.
Notes:
You may declare up to 99 lines in this table.
If you want to remove a redundant line, remove all information from it and click the Save button. The line will be removed.
Action Grant applications in the current year
Follow this procedure to declare action grant applications which the applicant or any of the co-applicant organisations submitted or intends to submit during the current year:
1. Access the table Action Grant applications in the current year.
By default the table contains one empty line:
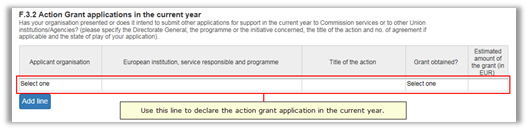
The following table lists the available fields:
|
Field |
Remarks |
M.L. |
|
Applicant organisation |
Select the required applicant or co-applicant organisation name (or abbreviation) from the drop-down list. |
- |
|
European institution, service responsible and programme |
Enter the name of the responsible service and programme related to the Union grant |
100 |
|
Title of the action |
Enter the title of the action linked to the Union grant. |
250 |
|
Grant obtained? |
Select the applicable entry from the drop-down list: Yes, No or Pending |
- |
|
Estimated amount of the grant (in EUR) |
Enter the estimated amount of the Union grant. |
- |
(M.L. = max. length as number of characters)
2. Fill out the fields as required and click the Save button.
The line may now look as follows:
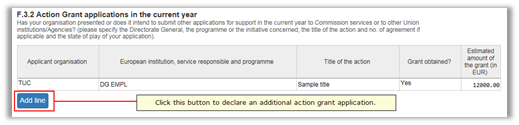
3. If required, click the Add new line button to declare an additional action grant application in the current year.
4. Repeat this procedure, until you have declared all action grant applications as required.
Notes:
You may declare up to 15 lines in this table.
If you want to remove a redundant line, remove all information from it and click the Save button. The line will be removed.
Operating grants
Follow this procedure do declare operating grants obtained by the applicant or any of the co-applicant organisations:
1. Access the table Operating grants.
By default the table contains one empty line:
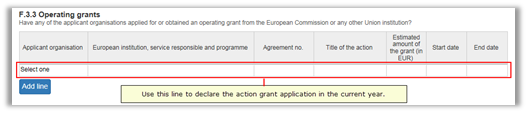
The following table lists the available fields:
|
Field |
Remarks |
M.L. |
|
Applicant organisation |
Select the required Applicant or Co-Applicant organisation name (or abbreviation) from the drop-down list. |
- |
|
European institution, service responsible and programme |
Enter the name of the European institution and responsible service linked to the operating grant |
100 |
|
Agreement number |
Enter the agreement number linked to the operating grant. |
|
|
Title of the action |
Enter the title of the action linked to the Union grant. |
250 |
|
Estimated amount of the grant (in EUR) |
Enter the estimated amount of the Union grant. |
- |
|
Start date |
Enter the start date of the operating grant (in the format dd/mm/yyyy) |
- |
|
End date |
Enter the end date of the operating grant (in the format dd/mm/yyyy) |
|
(M.L. = max. length as number of characters)
2. Fill out the fields as required and click the Save button.
The line may now look as follows:

3. If required, click the Add new line button to declare an additional operating grant.
4. Repeat this procedure, until you have declared all operating grants as required.
Notes:
You may declare up to 15 lines in this table.
If you want to remove a redundant line, remove all information from it and click the Save button. The line will be removed.
5.2.7. Action
The table below provides an overview of the fields available on the Action main section.
|
Field |
Remarks |
M.L. |
|
Title |
Enter the action title |
250 |
|
Type of activity / subprogramme / theme |
Select the required entry from the drop-down list. Note: This field is not available for all Calls for Proposals. |
- |
|
Short summary of the action |
Enter a short summary of the action. |
2000 |
|
Specific objective(s) |
Enter a description of the specific objectives of the action. |
4000 |
|
Start date |
Enter the expected start date in the format dd/mm/yyyy. Preferably the 1st day of the month. |
- |
|
Duration of the action |
Enter the number of months for the expected duration of the action. Max. 48 months. |
- |
|
Implementation of the action |
Enter a description of the way the action is going to be implemented. |
4000 |
|
Workplan |
Enter a summary of the workplan. |
4000 |
|
Will you subcontract any task related to the action? |
Select Yes or No from the drop-down list. |
- |
|
Timetable for action events |
Fill out a line for the main events of the action: · Start / End date: enter the date in format dd/mm/yyyy · Venue: Enter the place of venue (max. length 50 chars) · Type of event: Enter a description (max. length 200 chars) |
- |
|
Roles and responsibilities |
Describe the nature of the roles and responsibilities and the division of tasks between the co-applicants. |
4000 |
|
Targeted groups / sectors |
Indicate which groups / sectors are concerned by your action and why. |
4000 |
|
Transnational dimension |
Indicate the transnational dimension of the action. |
4000 |
|
Arrangements for evaluation / monitoring of the action |
Indicate the arrangements taken for the evaluation and the monitoring of the action. |
4000 |
|
Added value / innovativeness of the action |
Specify the added value / innovativeness of the action. |
4000 |
|
Expected results |
Specify the expected results and outputs of the action. |
4000 |
|
Use of results (multiplier effects and dissemination plans) |
Describe how you intend to use and disseminate the results of the action. |
4000 |
|
Language for correspondence |
Select the preferred language for correspondence with the European Commission from the drop-down list. The three official working languages are listed: English, French and German. |
- |
(M.L. = max. length as number of characters)
5.2.8. Annexes
The Annexes main section of the application form may look as follows:

The section lists documents that must be duly completed, signed and submitted along with the electronic application form.
There are two annex types:
Follow this procedure to download a template and upload the completed annex in SWIM:
1. For annexes with an available template, click the link click here to download this template.
Example:

2. Save the template on your hard disk:
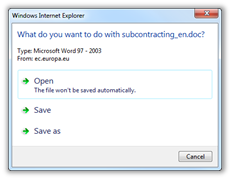
3. Open the template on your computer and complete it.
4. If you want to upload the completed form, click the Choose File or Browse button (the button label depends on the browser you are using):

5. Browse to the required file and open it.
The file name is displayed:

You may replace or delete the uploaded document if required.
5.2.9. Budget
The last main section of the SWIM application form always concerns the Budget, where applicants have to provide all the financial details of their project. Subtotal and total amounts at the end of each budget subsection are automatically calculated by the system when the application is saved by the applicant. Applicants can easily check the overall budget by clicking the main Budget option in the navigation bar:

The overall budget contains the following main headings and subheadings, common to every call for proposal:
§ Heading 1: Staff costs (as displayed in the screenshot above), with the following subheadings:
§ Management
§ Administration
§ Secretariat
§ Accounting
§ Other staff
§ Heading 2: Travel, accommodation and subsistence allowances
§ Heading 3: Cost of services, with the following subheadings:
§ Information dissemination
§ Translations
§ Reproductions and publications
§ Specific evaluation
§ Interpretations
§ External expertise
§ Other services
§ Heading 4: Administration costs, with the following subheadings:
§ Depreciation for purchase of equipment
§ Hire of rooms
§ Hire of interpreting booths
§ Audits
§ Financial services
§ Other administrative costs
§ The applicant must specify the financial contribution of himself, the co-applicants and third parties
§ He must also specify any revenue expected to be generated by the implementation of the action.
§ SWIM will automatically calculate the amount of the Union grant requested based on the figures provided in the application.
Attention:
Headings are organised by rows (each row containing a number of fields). If one field in a row is filled out, it is mandatory to complete all other fields in the same row.
If for a heading no costs must be declared, all fields in that heading should remain empty.
5.2.9.1. Filling out the Staff costs page
Follow this procedure to fill out the Staff costs page.
1. Click the Heading 1 link or select the Staff costs option from the Budget drop-down menu:
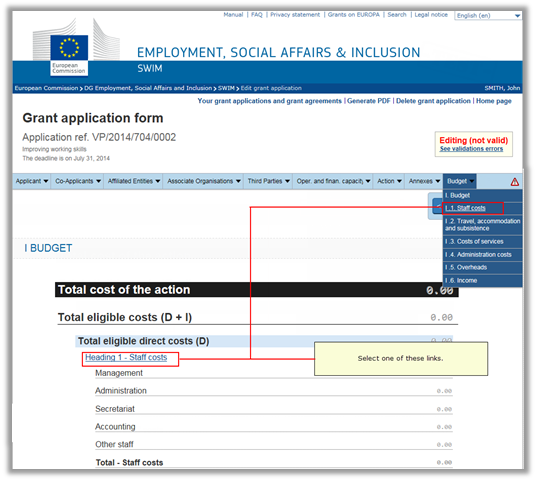
The Staff costs page is displayed:
Description:
The Staff costs page contains a section for each budget subheading.
Each budget subheading section contains a table with the following columns:
Incurred by: this drop-down list contains the name (or abbreviation when available) of the applicant and each co-applicant organisation.
Name
Name of the organisation and function within the organisation
Status
Daily salary cost
Number of days
Total
Each table contains a single row allowing the declaration of the first staff cost item.
The button Add new line is available to add rows up to the maximum of 99 lines for each subheading.
Once the maximum number of rows is reached, the following message is displayed, when you point to the deactivated button: Max. number of lines reached.
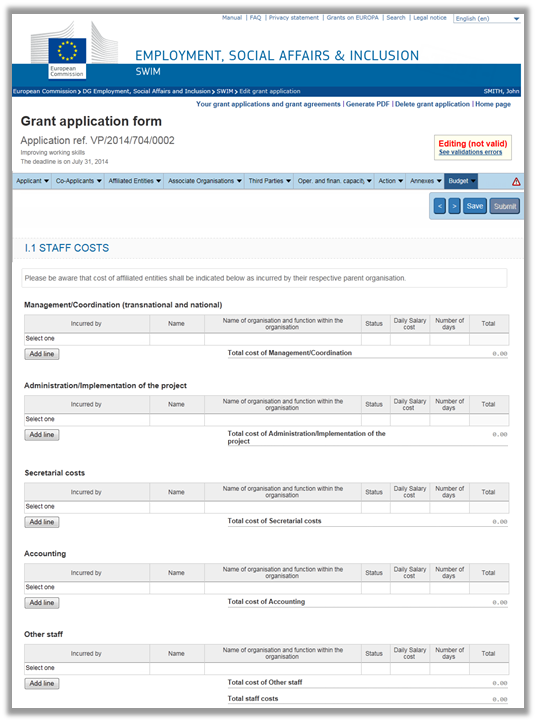
2. Declare a first staff cost entry by filling out the fields on an available table row.
In the following example, a first staff cost entry was defined in the Management/Coordination subheading:

Description:
The required organisation was selected from the Incurred by drop-down list.
The fields have been filled out:
§ Name (max. 100 characters)
§ Name of organisation (max. 1000 characters)
§ Status (max. 100 characters)
The fields Daily Salary cost and Number of days have fields have been filled out.
The Total field has been calculated by the system by multiplying the daily salary cost with the number of days.
3. Click the Add new line button as required and define new cost entries.
The Management/Coordination subheading may now look as follows:

The system calculates total values.
4. Click the ![]() icon at the end
of the row to delete this row, if required.
icon at the end
of the row to delete this row, if required.
5. Repeat this procedure for all Staff costs subheadings.
5.2.9.2. Filling out the Travel, accommodation and subsistence costs page
Follow this procedure to fill out the Travel, Accommodation and subsistence costs page.
1. Click the Heading 2 link or select the Travel, Accommodation and subsistence option from the Budget drop-down menu:

The Travel, accommodation and subsistence page is displayed:
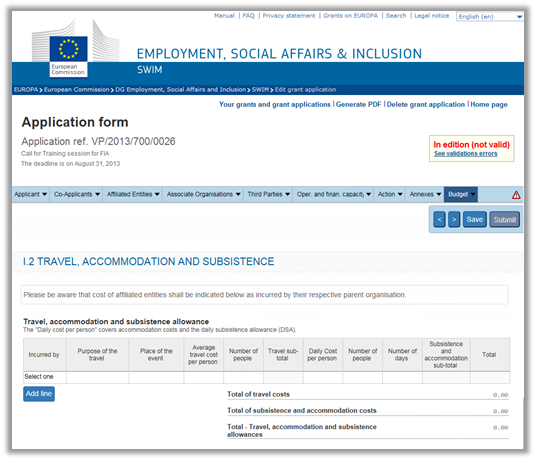
Description:
The Travel, Accommodation and Subsistence page contains a single section and table.
This table contains the following columns:
Incurred by: this drop-down list contains the name (or abbreviation when available) of the applicant and each co-applicant organisation.
Purpose of travel
Place of the event
Average travel cost per person
Number of people
Travel Subtotal
Daily Cost per person
Number of people
Number of days
Subsistence and accommodation subtotal
Total
The table contains a single row allowing the declaration of the first Travel cost item.
The button Add new line is available to add rows up to a maximum of 99 rows.
Once the maximum number of rows is reached, the following message is displayed, when you point to the deactivated button: Max. number of lines reached.
2. Declare a first travel cost entry by filling out the fields on the available table row.
Example:

Description:
The required organisation was selected from the Incurred by drop-down list.
The fields have been filled out:
§ Purpose of travel (max. 1000 characters)
§ Place of the event (max. 100 characters)
The fields Average travel cost per person and Number of people have been filled out.
The Travel subtotal field has been calculated by the system by multiplying the average travel cost with the number of people.
The fields Daily Cost per person, Number of people and Number of days have been filled out.
The Subsistence and accommodation subtotal field has been calculated by the system by multiplying daily cost per person, the number of people and number of days.
3. Click the Add new line button as required and define new cost entries.
The Travel costs table may now look as follows:
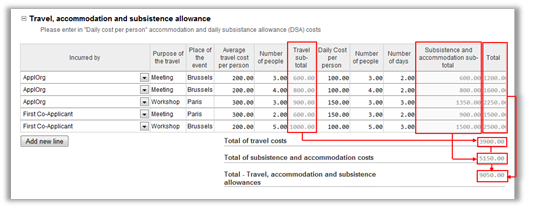
The system calculates total values.
4. Click the ![]() icon at the end
of the row to delete this row, if required.
icon at the end
of the row to delete this row, if required.
5. Repeat this procedure for all required Travel costs.
5.2.9.3. Filling out the Cost of services page
Follow this procedure to fill out the Cost of services page.
1. Click the Heading 3 link or select the Costs of services option from the Budget drop-down menu:
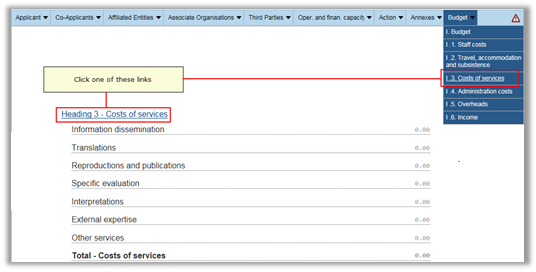
The Cost of services page is displayed:
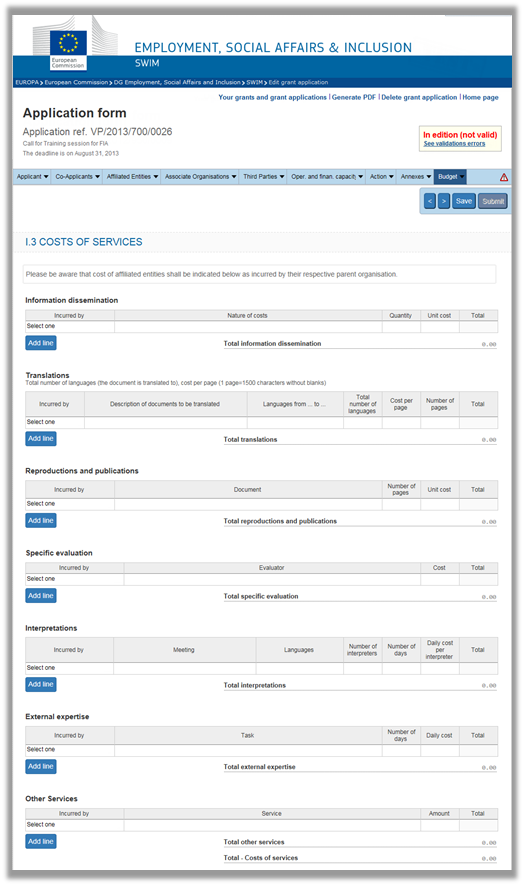
Description:
The Costs of Services page contains a section for each budget subheading.
Each budget subheading section contains a table with a number of columns describing the service. The following columns are common:
Incurred by: this drop-down list contains the name (or abbreviation when available) of the applicant and each co-applicant organisation.
Total
Each table contains a single row allowing the declaration of the first service cost item.
The button Add new line is available to add up to 99 for each subheading.
Once the maximum number of rows is reached, the button is no longer active and the following message is displayed: Max. number of lines reached.
2. Declare a first service cost entry by filling out the fields on an available table row.
In the following example, a few cost entries were defined in each service cost subheading:

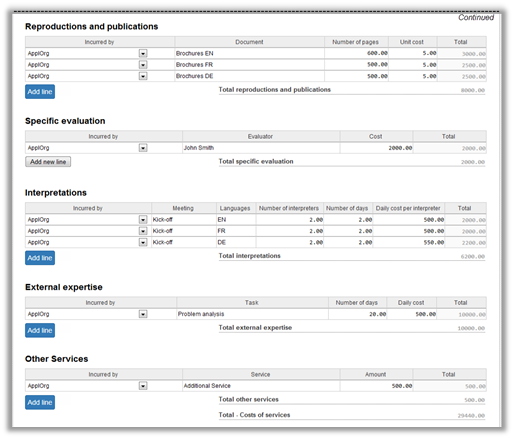
Description:
The required organisations were selected from the Incurred by drop-down list.
The fields have been filled out.
The subtotal and total fields have been calculated by the system.
3. Click the ![]() icon at the end
of the row to delete this row, if required.
icon at the end
of the row to delete this row, if required.
4. Repeat this procedure for all required Cost of services.
5.2.9.4. Filling out the Administration costs page
Follow this procedure to fill out the Administration costs page.
1. Click the Heading 4 link or select the Administration costs option from the Budget drop-down menu:
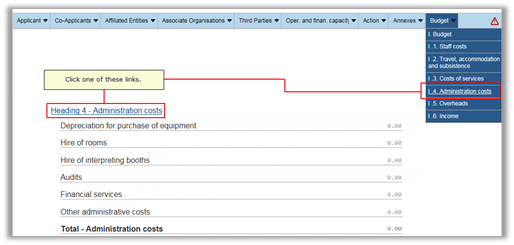
The Administration costs page is displayed:
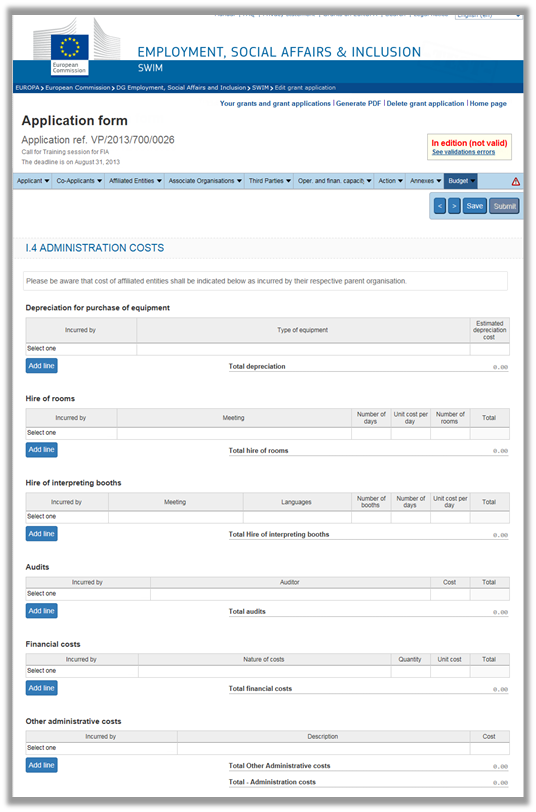
Description:
The Administration costs page contains a section for each budget subheading.
Each budget subheading section contains a table with a number of columns describing the service. The following columns are common:
Incurred by: this drop-down list contains the name (or abbreviation when available) of the applicant and each co-applicant organisation.
Total
Each table contains a single row allowing the declaration of the first administration cost item.
The button Add new line is available to add up to 99 rows for each subheading.
Once the maximum number of rows is reached, the button is no longer active and the following message is displayed: Max. number of lines reached.
2. Declare a first administration cost entry by filling out the fields on an available table row.
In the following example, a few cost entries were defined in each service cost subheading:

Description:
The required organisations were selected from the Incurred by drop-down list.
The fields have been filled out.
The subtotal and total fields have been calculated by the system.
3. Click the ![]() icon at the end
of the row to delete this row, if required.
icon at the end
of the row to delete this row, if required.
4. Repeat this procedure for all required Cost of services.
5.2.9.5. Filling out the Overheads page
Follow this procedure to fill out the Overheads page.
1. Click the Heading 5 link or select the Overheads option from the Budget drop-down menu:

The Overheads page is displayed:
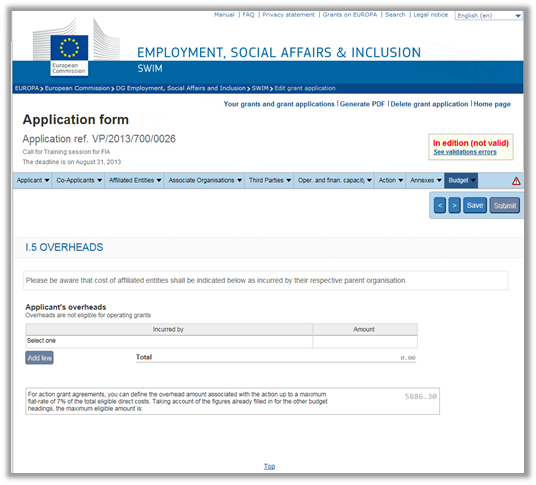
Description:
The Overheads page contains a single section with a table composed of a number of columns:
Incurred by: this drop-down list contains the name (or abbreviation when available) of the applicant and each co-applicant organisation. The applicant and each co-applicant can declare their overheads.
Amount
The table contains a single row allowing the declaration of the first overheads amount.
The button Add new line is available to add rows, until all applicants and co-applicants are listed. It is not possible to declare more than one overhead line per applicant or co-applicant.
2. Declare the required overhead entries.
In the following example, a few overhead rows were defined:

Description:
The required organisations were selected from the Incurred by drop-down list.
The Amount field has been filled out for each selected organisation.
The total field has been calculated by the system.
3. Click the ![]() icon at the end
of the row to delete this row, if required.
icon at the end
of the row to delete this row, if required.
5.2.9.6. Filling out the Income page
Follow this procedure to fill out the Income page.
1. Click the Income link or select the Income option from the Budget drop-down menu:
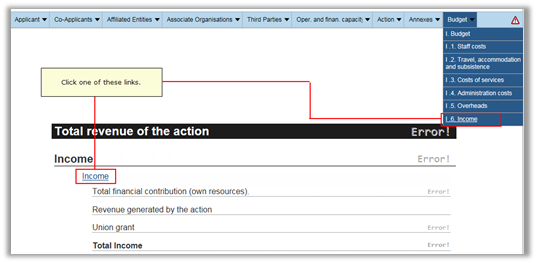
The Income page is displayed:
 Description:
The Income page contains one field and two tables allowing to list contributions in cash:
Applicant's contribution: Fill in the applicant's contribution in cash.
Table listing the co-applicants' contribution: This table allows declaring the contribution in cash for each co-applicant. You can only define a single row for each co-applicant.
Table listing the third parties' contribution: This table allows declaring the name and the contribution in cash for up to 99 third parties.
The Total contribution in cash field contains the calculated total of the three income sources listed above.
The Income page contains also the following fields:
Revenue generated by the action: Fill in expected amount of revenue generated by the action. This amount will be deducted from the calculated Union grant.
Union grant: The system calculates the amount of the union grant based on the total income, contribution in cash and revenue generated by the action.
Total Income: The system copies the amount of the total eligible costs in this field.
2. Fill out the fields as required.
In the following example, the Income page has been completed:
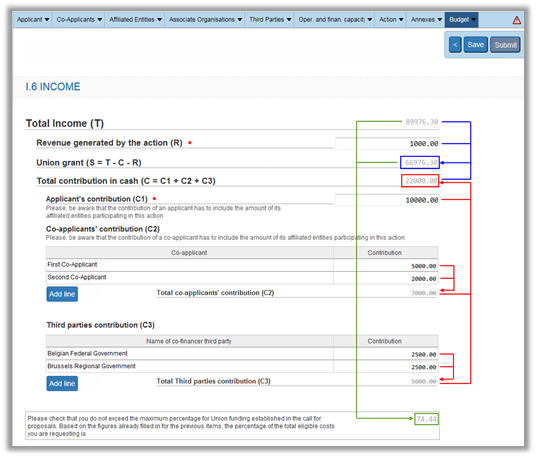
The arrows indicate how the system calculates the amounts and values:
Red arrows: Total contribution in cash =
Applicant contribution + Total co-applicants' contribution + Total third
parties contribution =
10000.00 + 7000.00 + 5000.00 = 22000.00
Blue arrows: Union Grant =
Total Income – Contribution in cash – Revenue generated by the action =
89976.30 – 22000 – 1000 = 66976.30
Green arrows: Co-financing percentage =
Union grant / Total income =
66976.30 / 89976.30 = 74.44%
3. Check that the maximum percentage for Union funding is not exceeded.
This maximum percentage is defined in each call for proposals separately.
4. Click the ![]() icon at the end
of the row to delete this row, if required.
icon at the end
of the row to delete this row, if required.
5. Regularly click the Save button at the top of the screen.
5.3. Obtaining a printable version of a grant application
A printable version of a grant application can be obtained for grant applications with any status indication.
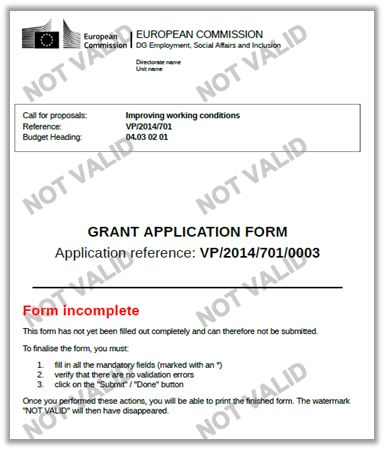
For grant applications with Not submitted status, you have to click the link the Generate PDF link at the top of the application form:

The generated PDF will contain the NOT VALID watermark:

For grant applications with Submitted or Not granted status, you have to click the Printable version of your grant application link on the Grant application successfully submitted screen:
The generated PDF will be displayed:
For grant applications with Not submitted in time or Archived status you have to click the Printable version of your application link on the Application not submitted screen:
The generated PDF will contain the NOT VALID watermark:

For grant applications with Archived status, you have to click the Printable version of your grant application link on the Grant application not submitted screen:
The generated PDF will contain the NOT VALID watermark:
5.4. Deleting a grant application
A grant application can be deleted, if it has the Not submitted status. Follow this procedure to delete such a grant application:
1. Access the list of your grant applications and grant agreements.
Refer to Accessing the list of your grant applications and grant agreements.
The list of Your grant applications and grant agreements is displayed:
Note: If the grant application you are looking for is not available, you can add it to your list by asking a current editor to invite you as an editor as well, refer to Managing editors.
2. Click the title link of the grant application you want to delete.
The grant application form is displayed:
3. Click the link Delete grant application.
The following confirmation screen is displayed:
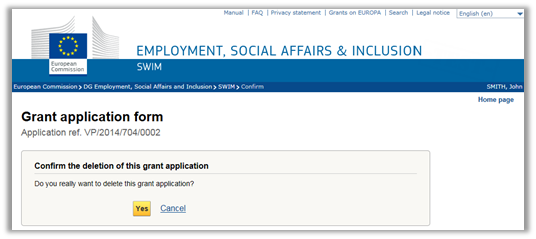
4. Click the Yes button to confirm the deletion of the grant application.
5.5. Archiving a grant application
A grant application can be archived, if it has the Not submitted in time status. If you archive such an application, the data you entered will not be deleted from the SWIM system, so that you may use it for future reference. If you do not archive an application, it will be removed from the SWIM system three months after the submission deadline.
Attention!
Once an application has been removed from the SWIM system, it is impossible to
retrieve its data!
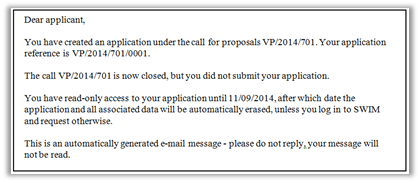
You are reminded of an application not submitted in time by means of an e-mail message in the following format:
Follow this procedure to archive a grant application:
1. Access the list of your grant applications and grant agreements.
Refer to Accessing the list of your grant applications and grant agreements.
The list of Your grant applications and grant agreements is displayed:

As an application that was not submitted on time can never result in a grant agreement, it is considered an outdated application.
2. Click the link Show outdated applications.
The outdated applications are added to the list of grant applications:
3. Click the title link of the grant application you want to archive.
The Grant application not submitted screen is displayed:
4. Click the button Archive application.
The following message is displayed:
You have requested to archive. Your data will not be removed.
As a result, you will still be able to access this follow-up screen and click the link Printable version… for future reference.
6. Working with your grant agreements
You can only perform actions to the grant agreements that are assigned to your EU Login account, i.e. for which you are an editor. You access your grant agreements from the list of Your grant applications and grant agreements. Refer to Accessing the list of your grant applications and grant agreements.
The Grants agreements section in the list of Your grant applications and grant agreements may look as follows:
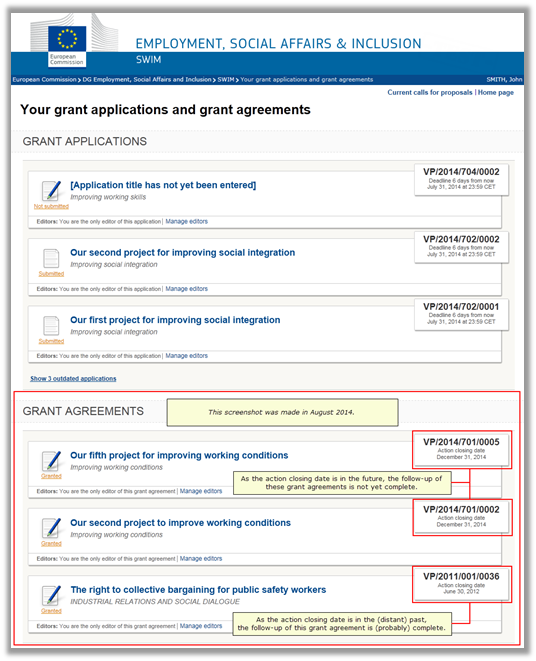
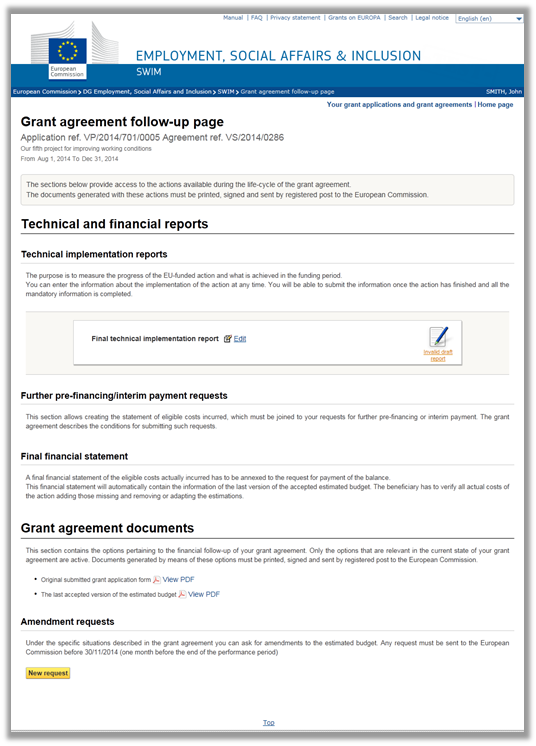
Click the title link to display the Grant agreement follow-up screen. Once you have accessed that screen, you may be able to perform one or more of the following actions, depending on the current status of the grant agreement:
Creating and submitting amendment requests
Creating and submitting further pre-financing / interim payment requests
Filling out and submitting the final technical implementation report
Filling out and submitting an annual report
Creating and submitting the final financial statement
6.1. Creating and submitting amendment requests
Beneficiaries use SWIM to create and submit amendment requests to a signed grant agreement. The following amendment request types are available:
Participants amendment requests
Combined budget and participants amendment requests
Refer to the sections below for a detailed description.
Note:
Other types of amendment to your grant agreement, such as the extension of the duration, change of information related to the coordinator (legal entity, bank account, legal representative) cannot be requested in the current version of SWIM. Such amendment requests must be addressed directly to the European Commission. Refer to the contact details listed in article I.6.2 Communication details of the Commission of your grant agreement.
6.1.1. Creating and submitting a budget amendment request
Follow this procedure to create a budget amendment request:
1. Access the list of your grant applications and grant agreements.
Refer to Accessing the list of your grant applications and grant agreements.
The List of your grant applications and grant agreements is displayed:
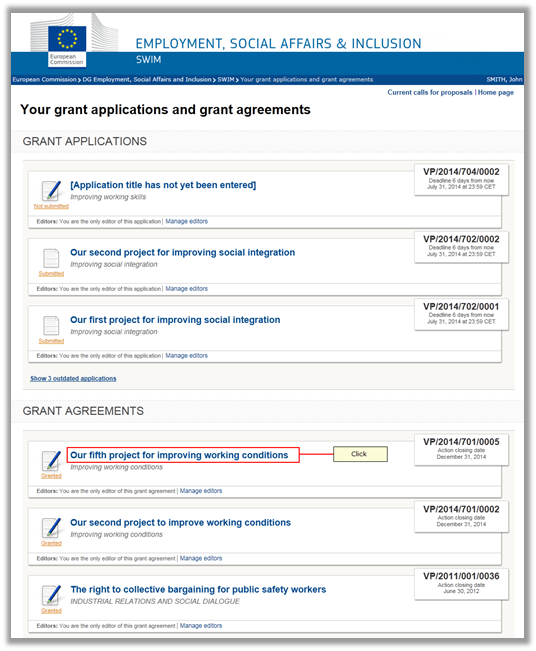
Note: If the grant agreement you are looking for is not available, you can add it to your list by asking a current editor to invite you as an editor as well, refer to Managing editors.
2. Click the title link matching the required grant agreement.
The Grant agreement follow-up page is displayed:
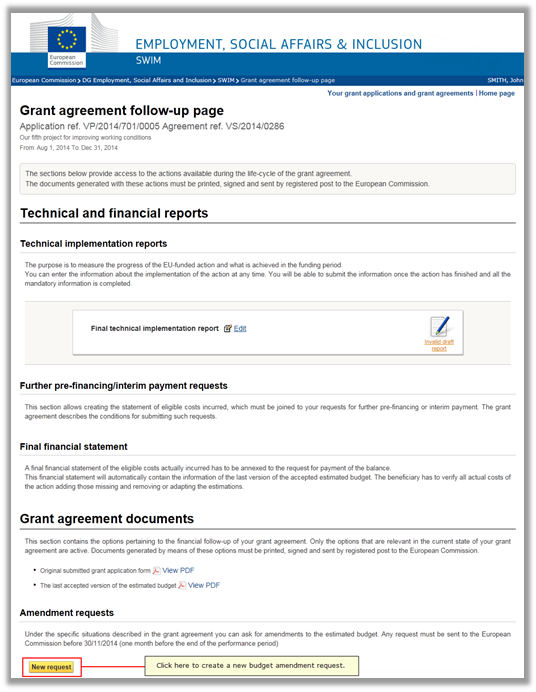
3. Click the title New request button in the Amendment Requests section.
Note: If the button is not available, one or more of the following preconditions for creating a budget amendment request are not fulfilled:
There should be no previous amendment request that has not yet been submitted.
There should be no previous amendment request for which the revision has not been finalized (accepted or rejected).
The action closing date must be more than one month in the future OR the Commission has allowed the late introduction of a budgetary amendment.
If you are the only beneficiary of your grant agreement, the page Request for budget amendment is displayed. You can then go immediately to step 5 below.
If your grant agreement has at least one co-beneficiary, the page Select amendment type is displayed:
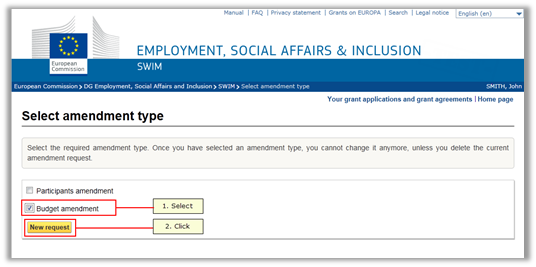
4. Select the Budget amendment check box and click the New Request button.
5. The Request for budget amendment page is displayed:
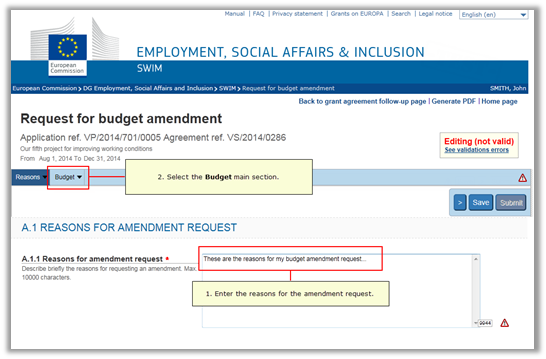
6. Enter the reasons for the amendment request and select the Budget main heading.
The budget overview page is displayed:
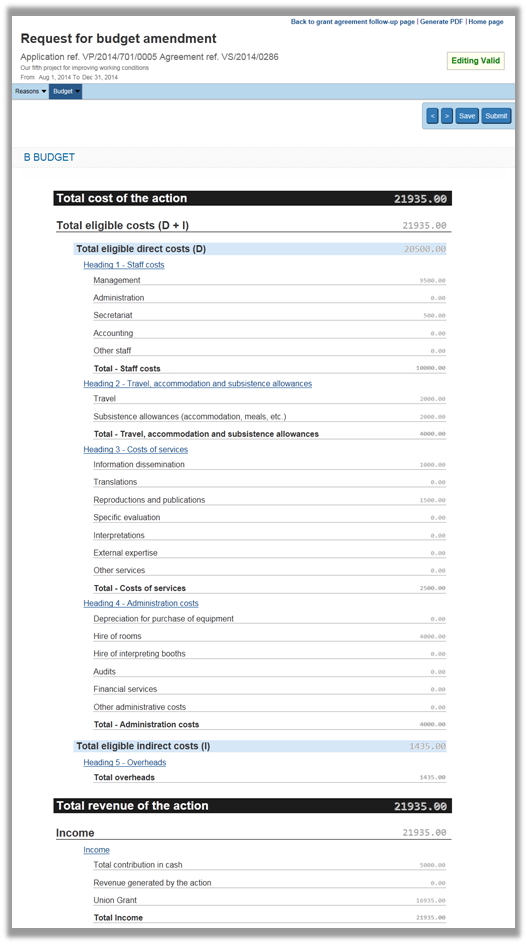
It contains the following amounts:
If this is the first request for budget modification, the amounts match the ones from the initial accepted budget, as defined in the original grant agreement.
If you have already defined requests for budget modification, the amounts match the ones from the most recent request, whether this request was accepted or rejected.
7. Edit the budget as explained in the budget section and enter comments justifying the amendments.
Please be sure not to increase the amounts, in such a way that the Union grant exceeds the value or percentage approved in the original grant agreement. The purpose of defining a budget amendment is to move the amounts to other categories without increasing the approved Union grant amount.
In the following example, costs were moved from the Staff costs to Cost of services main budget heading:

As indicated above, you are encouraged to enter comments next to the modified line explaining the changes.
8. Regularly save your request by clicking the Save button on the navigation bar.
The budget amendment request is saved by the system (but not yet submitted).
9. You may click the link Back to grant follow-up page, if you want to continue your work at a later moment.
The Grant agreement follow-up screen will again be displayed. The budget amendment request is displayed as follows in the Amendment requests section:

You may edit or delete the amendment request, as long as it is not submitted.
10. Click the Edit link to return to the Request for budget amendment screen.
You may again edit the amounts.
11. Click the Submit button in the navigation bar, once you have performed all required changes to the budget:
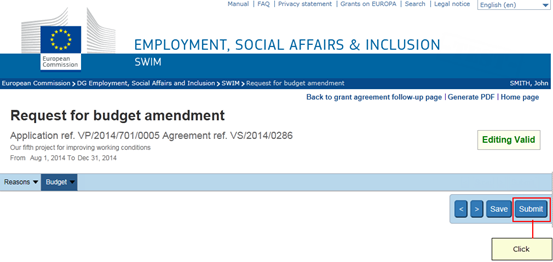
The following confirmation message is displayed:
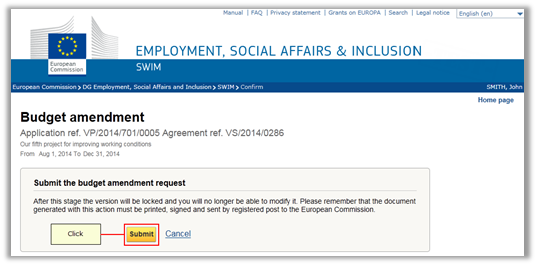
12. Click the Submit button.
The Grant agreement follow-up page is again displayed. The budgetary amendment is now displayed as follows:
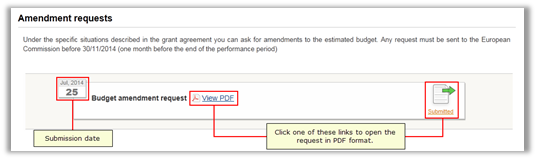
13. Click the View PDF link or click the Submitted icon and print the request.
The first page of the PDF file looks as follows:
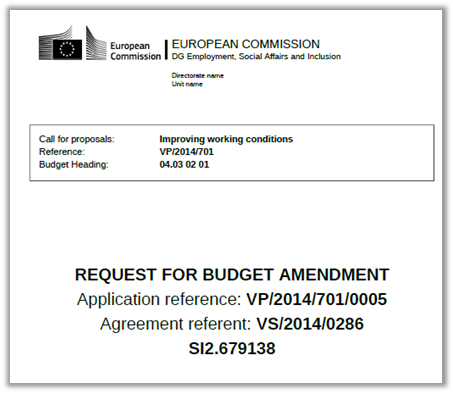
14. Fill out and sign the Certification section:
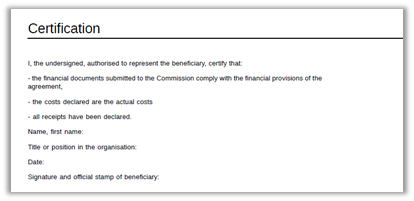
The request is to be annexed to a request letter signed by the legal representative of the applicant organisation. These documents must be sent by post to the responsible Unit at the European Commission, as specified in the grant agreement.
The Commission may accept without revision, accept with revision or reject the budget amendment request:
If the budget amendment request is accepted without revision, the Commission accepts the modified budget without the creation of an amendment to the original grant agreement. The mention Accepted will appear next to the request:
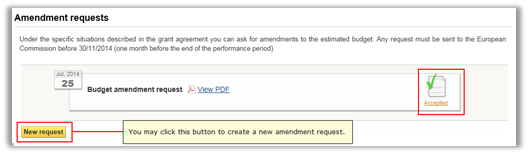
If the budget amendment request is accepted with revision, the Commission revises and then accepts the modified budget (with or without revising the amounts) and creates an amendment to the original grant agreement. This amendment will be sent to the beneficiary in order to be signed. Once the amendment has been signed by both parties, the mention Accepted will appear next to request:
If the budget amendment request is rejected, the mention Rejected will appear next to the request:
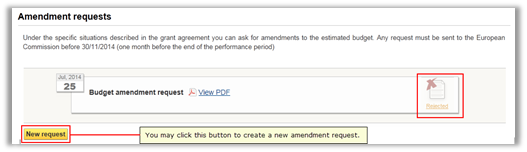
If you decide to create a new request, the starting values will match the ones from the rejected request.
6.1.2. Creating and submitting a participants amendment request
Note: Creating and submitting a participants amendment request only applies to grant agreements with at least one co-beneficiary. Possible participant amendments include:
§ Changing the definition fields (address, phone number, etc.) of current co-applicants and/or affiliated entities;
§ Marking the end date of participation in the action of current co-applicants and/or affiliated entities;
§ Adding new co-applicants and/or affiliated entities and their start date of participation in the action.
Follow this procedure to create and submit a participants amendment request:
1. Access the list of your grant applications and grant agreements.
Refer to Accessing the list of your grant applications and grant agreements.
The List of your grant applications and grant agreements is displayed:
Note: If the grant agreement you are looking for is not available, you can add it to your list by asking a current editor to invite you as an editor as well, refer to Managing editors.
2. Click the title link matching the required grant agreement.
The Grant agreement follow-up page is displayed:

3. Click the title New request button in the Amendment Requests section.
Note: If the button is not available, one or more of the following preconditions for creating a participants amendment request are not fulfilled:
There should be no previous amendment request that has not yet been submitted.
There should be no previous amendment request for which the revision has not been finalized (accepted or rejected).
The action closing date must be more than one month in the future OR the Commission has allowed the late introduction of an amendment request.
The Select amendment type page is displayed:
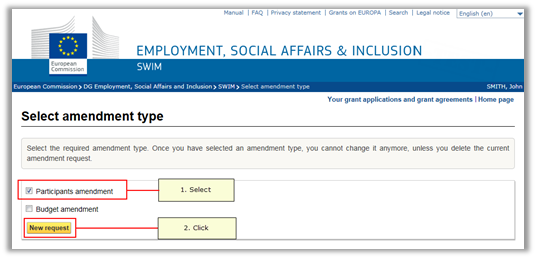
4. Select the Participants amendment check box and click the New Request button.
The Request for participants amendment page is displayed:
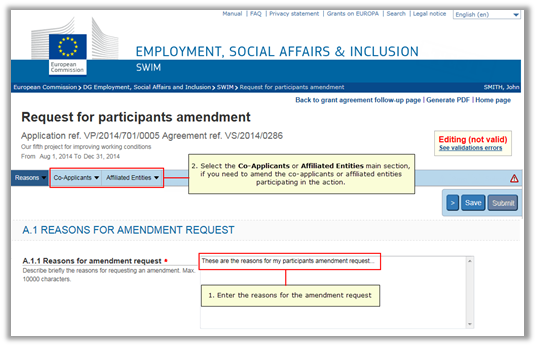
5. Enter the reasons for the amendment request and select the Co-Applicants main heading, if you need to amend the co-applicants involved in the action.
The Co-Applications involved in the action page is displayed:
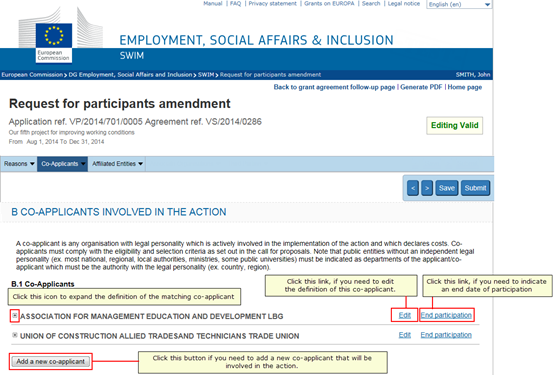
6. Click the Edit link and perform the required changes to definition of an existing co-applicant.
The definition fields belonging to the selected co-applicant are displayed in edit mode:
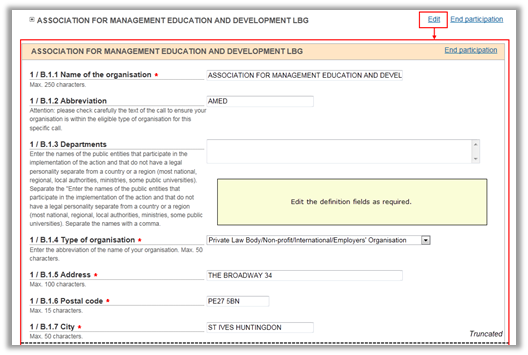
An overview of all field descriptions can be found in the section Co-Applicant field descriptions.
7. Click the End participation link to define the participation end date for an existing co-applicant.
The following dialog is displayed:
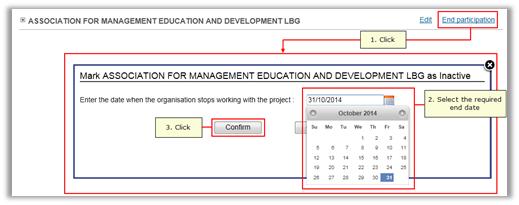
8. Click the button Add a new co-applicant to define a new co-applicant and the date they start their involvement in the project.
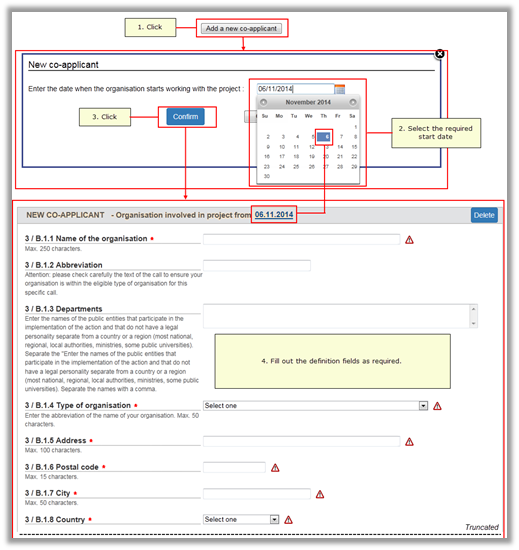
An overview of all field descriptions can be found in the section Co-Applicant field descriptions.
9. Select the Affiliated Entities main heading, if you need to amend the affiliated entities involved in the action.
The Affiliated Entities page is displayed:

10. Perform the required changes in a similar way as described for the co-applicants.
An overview of all field descriptions can be found in the section Affiliated entities field descriptions.
11. Regularly save your request by clicking the Save button on the navigation bar.
The participants amendment request is saved by the system (but not yet submitted).
12. You may click the link Back to grant follow-up page, if you want to continue your work at a later moment.
The Grant agreement follow-up screen will again be displayed. The participants amendment request is displayed as follows in the Amendment requests section:

You may edit or delete the amendment request, as long as it is not submitted.
13. Click the Edit link to return to the Request for budget amendment screen.
You may perform additional changes.
14. Click the Submit button in the navigation bar, once you have performed all required changes to the participants:

The following confirmation message is displayed:
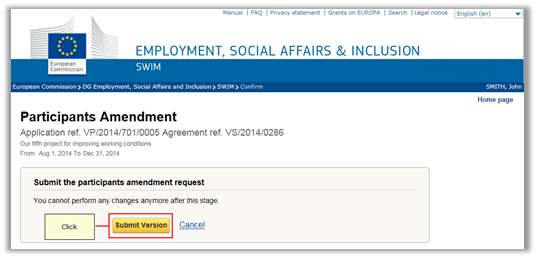
15. Click the Submit version button.
The Grant agreement follow-up page is again displayed. The amendment request is now displayed as follows:
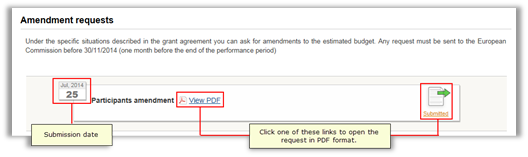
16. Click the View PDF link or click the Submitted icon and print the request.
The first page of the PDF file looks as follows:
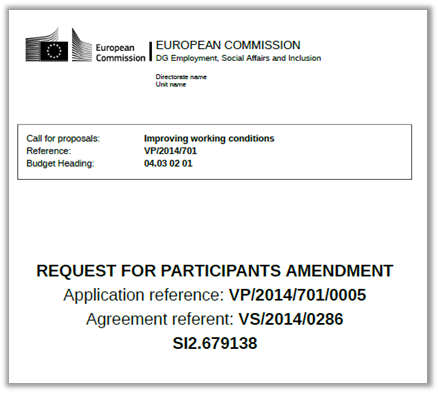
17. Fill out and sign the Certification section:
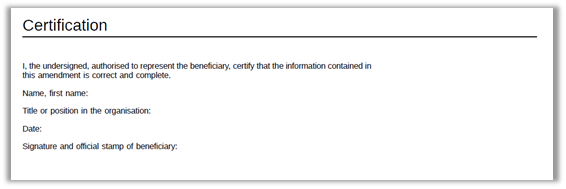
The request is to be annexed to a request letter signed by the legal representative of the applicant organisation. These documents must be sent by post to the responsible Unit at the European Commission, as specified in the grant agreement.
The Commission may accept or reject the participants amendment request:
If the amendment request is accepted, the Commission revises and accepts the modifications and creates an amendment to the original grant agreement. This amendment will be sent to the beneficiary in order to be signed. Once the amendment has been signed by both parties, the mention Accepted will appear next to request:
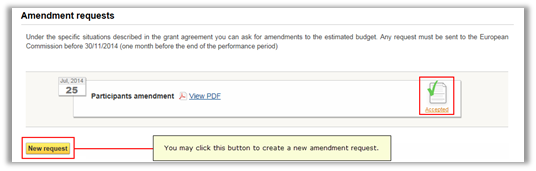
If the amendment request is rejected, the mention Rejected will appear next to the request:
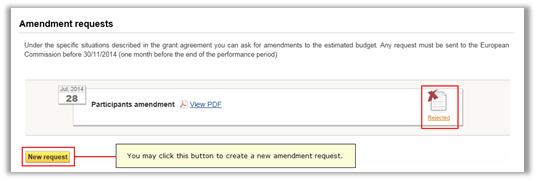
You will also get an official letter from the Commission explaining why the request was rejected. If you decide to create a new request, the starting values will match the ones from the rejected request.
6.1.3. Creating and submitting a combined budget and participants amendment request
Note: Creating and submitting a combined budget and participants amendment request only applies to grant agreements with at least one co-beneficiary.
Follow this procedure to create and submit a combined budget and participants amendment request:
1. Access the list of your grant applications and grant agreements.
Refer to Accessing the list of your grant applications and grant agreements.
The List of your grant applications and grant agreements is displayed:
Note: If the grant agreement you are looking for is not available, you can add it to your list by asking a current editor to invite you as an editor as well, refer to Managing editors.
2. Click the title link matching the required grant agreement.
The Grant agreement follow-up page is displayed:
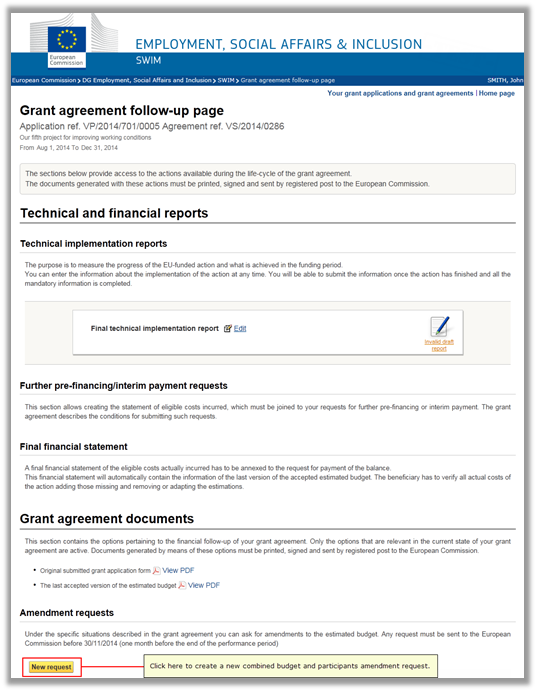
3. Click the title New request button in the Amendment Requests section.
Note: If the button is not available, one or more of the following preconditions for creating an amendment request are not fulfilled:
- There should be no previous amendment request that has not yet been submitted.
- There should be no previous amendment request for which the revision has not been finalized (accepted or rejected).
- The action closing date must be more than one month in the future OR the Commission has allowed the late introduction of a budgetary amendment.
The Select amendment type page is displayed:

4. Select both check boxes and click the New Request button.
The Request for budget and participants amendment page is displayed:
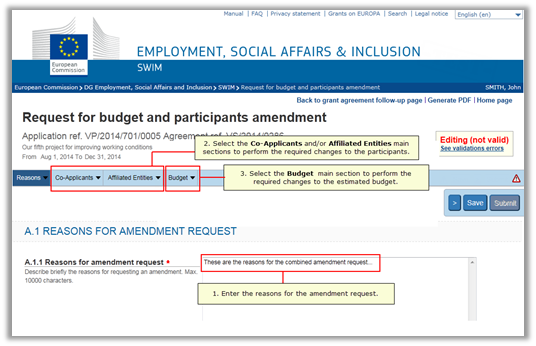
5. Enter the reasons for the amendment request.
6. Select the Co-Applicants and/or Affiliated Entities main heading to define the required changes to the participants.
Refer to Creating and submitting a participants amendment request for a detailed description.
7. Select the Budget main heading, if you need to amend the estimated budget.
Refer to Creating and submitting a budget amendment request for a detailed description.
Note: It is advised to edit first the participants and then the budget. In that way, it is already possible to declare costs incurred by these new participants.
8. Regularly save your request by clicking the Save button on the navigation bar.
The amendment request is saved by the system (but not yet submitted).
9. You may click the link Back to grant follow-up page, if you want to continue your work at a later moment.
The Grant agreement follow-up screen will again be displayed. The amendment request is displayed as follows in the Amendment requests section:
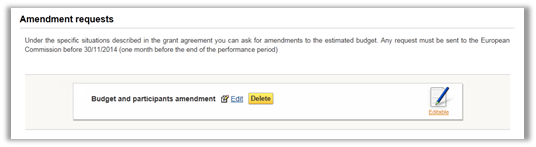
You may edit or delete the amendment request, as long as it is not submitted.
10. Click the Edit link to return to the Request for budget and participants amendment screen.
You may perform additional changes.
11. Click the Submit button in the navigation bar, once you have performed all required changes:
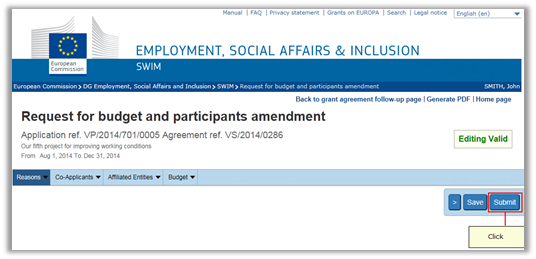
The following confirmation message is displayed:
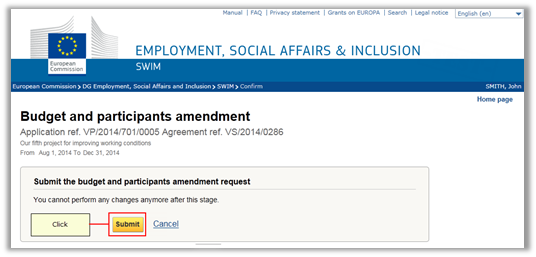
12. Click the Submit button.
The Grant agreement follow-up page is again displayed. The budget and participants amendment request is now displayed as follows:
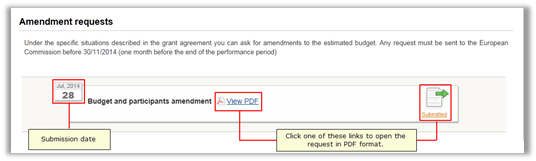
13. Click the View PDF link or click the Submitted icon and print the request.
The first page of the PDF file looks as follows:
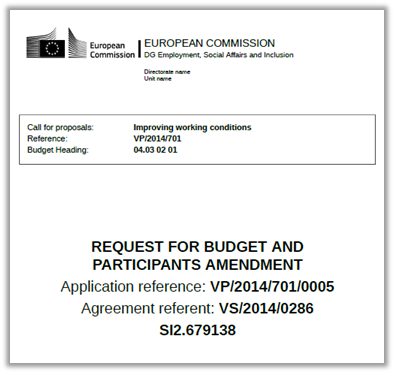
14. Fill out and sign the Certification section:
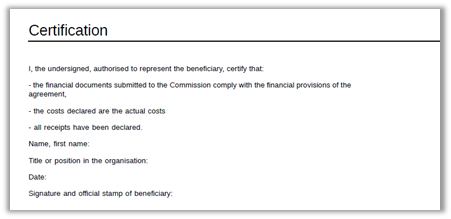
The request is to be annexed to a request letter signed by the legal representative of the applicant organisation. These documents must be sent by post to the responsible Unit at the European Commission, as specified in the grant agreement.
The Commission may accept or reject the amendment request:
If the amendment request is accepted, the Commission revises
and accepts the modifications and creates an amendment to the original grant
agreement. This amendment will be sent to the beneficiary in order to be
signed. Once the amendment has been signed by both parties, the mention Accepted will appear next to request:
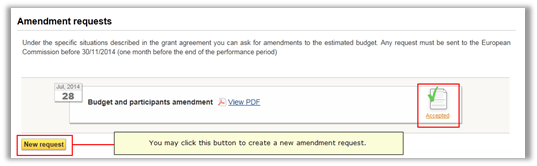
If the amendment request is rejected, the mention Rejected will appear next to the request:
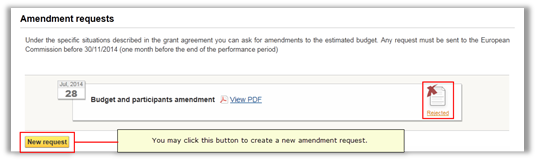
You will also get an official letter from the Commission explaining why the request was rejected. If you decide to create a new request, the starting values will match the ones from the rejected request.
6.2. Creating and submitting a further pre-financing / interim payment request
If the payment arrangements of the grant agreement foresee the possibility of requesting a second pre-financing payment, the beneficiary can request such a payment, if he has used at least 70% of the previous pre-financing instalment paid.
In order to prove that he has already incurred these costs, the beneficiary uses SWIM to create, submit and print a request for further pre-financing / interim payment.
NB: the purpose of having the pre-financing request in SWIM is purely informative for the commission. The commission accepts or rejects the pre-financing request internally and informs the beneficiary via mail. The status of the submitted pre-financing request will remain 'submitted' even if the commission decides to accept it or reject it. The information included in the pre-financing requests will not be copied in the final financial statement.
Follow this procedure to create a request for further pre-financing / interim payment:
1. Access the list of your grant applications and grant agreements.
Refer to Accessing the list of your grant applications and grant agreements.
The list of Your grant applications and grant agreements is displayed:

Note: If the grant agreement you are looking for is not available, you can add it to your list by asking a current editor to invite you as an editor as well, refer to Managing editors.
2. Click the title link matching the required grant agreement.
The Grant agreement follow-up page is displayed:
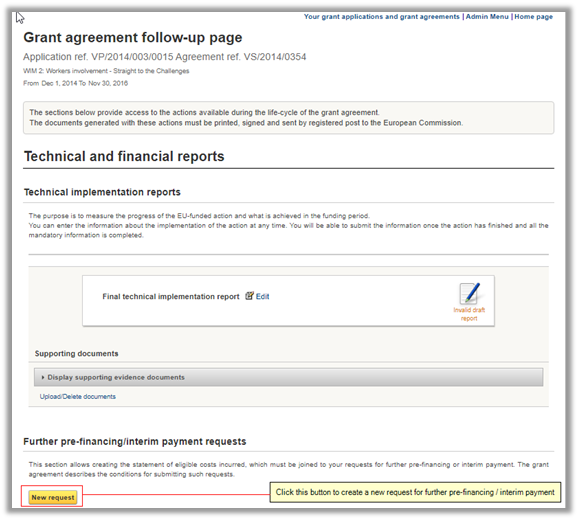
3. Click the New request button in the Further pre-financing/interim payment requests section.
Note: If the button is not available, the preconditions for creating a pre-financing request are not fulfilled:
- The current date must be more than 45 days after the signature date of the grant agreement.
- The current date must be before the action closing date.
- The Final Financial Statement must not be submitted.
The Request for pre-financing/interim payment page is displayed. It contains an empty budget form:

Please note the important information at the top of the budget form: “In order to submit the pre-financing payment request, please download and complete this progress report template and upload it as a supporting document in the grant agreement follow-up page.”
4. Click the different Budget Headings to declare the costs already incurred in the implementation of the action.
5. Define a value for the Overheads, if applicable.
6. Click the Save button in the navigation bar.
The request is saved by the system (but not submitted yet).
7. Click the link to the Progress report template.
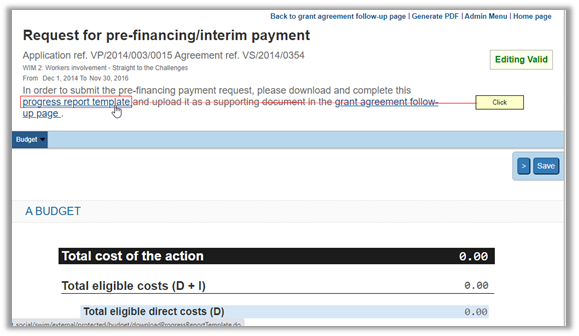
The settings of your internet browser will determine if the file containing the Progress Report template will be downloaded with or without confirmation and the location of the download.
8. Fill in the applicable fields in the Progress Report in a text editor of your choice (e.g. Microsoft Word).
Please note that the process of filling in the Progress Report is not managed by the SWIM application and data inserted in the Progress Report template must be saved regularly.
9. Once the Progress Report is filled in and validated, click the link Back to grant follow up page.
The Grant agreement follow-up screen will be displayed. The pre-financing request is displayed as follows in the Further pre-financing / interim payment section:
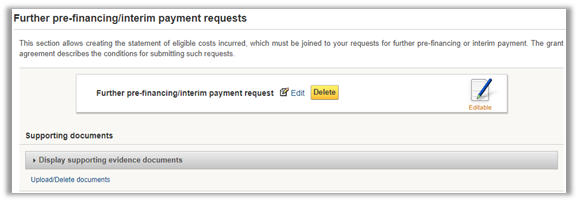
You may edit or delete the request, as long as it is not submitted.
10. Click the Upload/Delete documents link in order to add the Progress Report to the Further pre-financing / interim payment request.
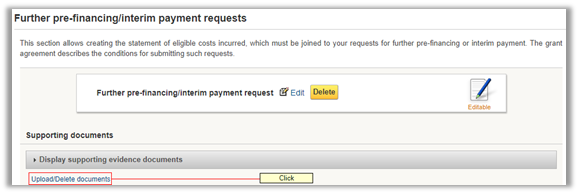
The Supporting Documents page is displayed.
11. Set the type of supporting document you want to add in the Category section of the page.
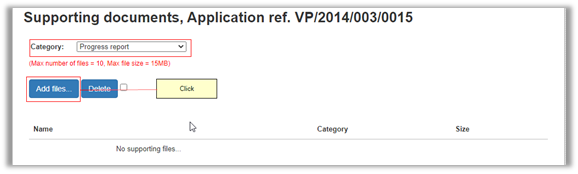
12. Click the Add Files button in order to add a document in the selected Category. The available categories are Progress Report and Other documents.
The Windows browsing window will open, allowing you to browse and select the files to be attached.
13. Please note that the allowed extension files are: .doc, .docx, .pdf, .xls, .xslx, .jpg, .jpeg, .png, .ppt, .pptx and .zip, the maximum number of files that can be added is 10 and the maximum file size is 15MB.The documents that were added incorrectly can be deleted by pressing the Delete button found on the respective row.
The system will request confirmation of the deletion, and, if confirmation is given, the file will be removed from the list.
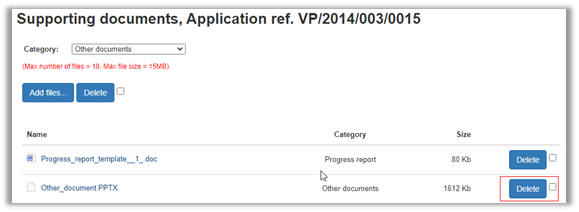
14. Once you have added all the necessary supporting documents, click the link Back to grant agreement follow up page.
The Grant agreement follow-up screen will be displayed.
15. Click the Display supporting evidence documents dropdown to view all the documents attached to the Request for pre-financing / interim payment request.
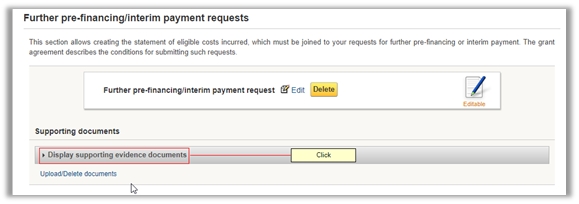
16. Click the Edit link to return to the Further pre-financing / interim payment request page.
You may continue editing the budget amounts.
The Submit button is now displayed, since a document of type Progress report was added to the Further pre-financing / interim payment request.
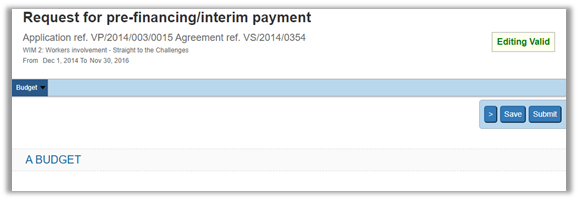
17. Click the Submit button.
The following confirmation message is displayed:
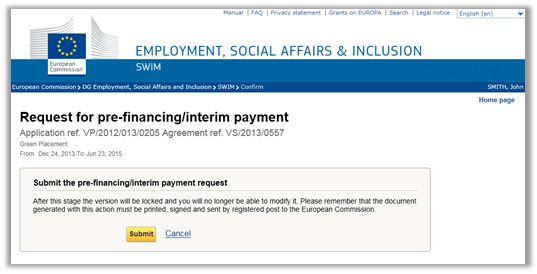
The Grant agreement follow-up page is displayed. The further pre-financing request is displayed as follows:
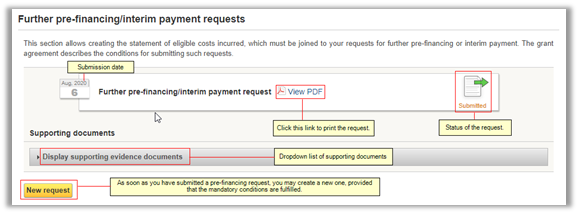
18. Click the View PDF link or click the Submitted icon and print the request.
The first page of the PDF file looks as follows:
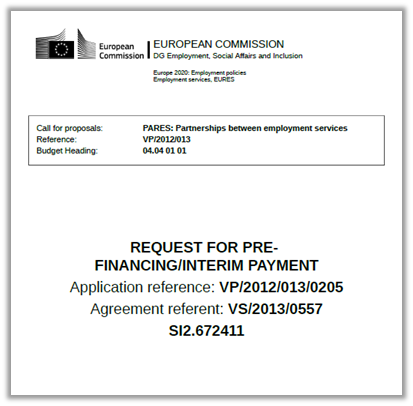
19. Fill out and sing the Certification section:
The request is to be annexed to a request letter signed by the legal representative of the applicant organisation. These documents must be sent by post to the responsible Unit, as specified in the grant agreement.
6.3. Filling out and submitting the final technical implementation report
Once the beneficiary's action comes to its end date, the final technical implementation report and the final financial statement must be sent to the Commission within the period established in the grant agreement.
The beneficiary uses SWIM to create and submit the electronic version of both documents. This section explains how to create and submit the final technical implementation report. (Please click here to browse to the section about the creation and submission of the final financial statement.)
For projects under the PROGRESS programme, the beneficiary must also fill out annual reports concerning quantitative information.
Follow this procedure to fill out and submit the final technical implementation report:
1. Access the list of your grant applications and grant agreements.
Refer to Accessing the list of your grant applications and grant agreements.
The list of Your grant applications and grant agreements is displayed:
Note: If the grant agreement you are looking for is not available, you can add it to your list by asking a current editor to invite you as an editor as well, refer to Managing editors.
2. Click the title link matching the required grant agreement.
The Grant agreement follow-up page is displayed:
Note: If your grant agreement is linked to a PROGRESS call for proposals, the section also contains one or more annual report entries:
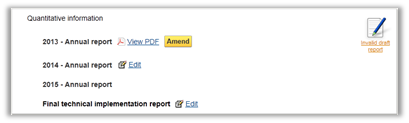
Refer to the chapter Creating annual reports for a detailed explanation.
3. Click the Edit link in the Technical implementation report information section.
The Final technical implementation report page is displayed.
It contains an empty form:
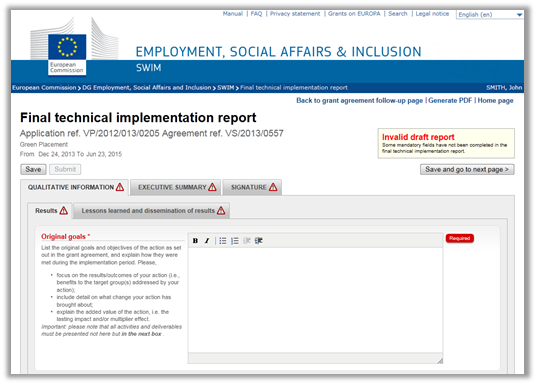
The form contains:
The titles of the technical implementation report, displayed as tabs:
Qualitative information
Quantitative information (optional, not in the screenshot above)
Executive summary
Signature
The status of your technical implementation report. This can either be:
Invalid draft report, which means that your technical implementation report has not yet been submitted because it still contains errors or missing information.
Valid draft report, which means all mandatory fields of the technical implementation report (marked with the red asterisk) have been properly populated. The technical implementation report cannot yet be submitted, because the action end date is not yet reached AND/OR (for PROGRESS projects only) because one or more annual reports have not yet been submitted.
Ready for submission, which means all mandatory fields of the technical implementation report (marked with the red asterisk) have been properly populated and the technical implementation report is ready to be submitted by clicking on the Submit button.
4. Fill out the Qualitative Information tab and its subtabs.
In this section you can fill the text boxes with the results, the lessons learned and dissemination of results of the project.
In each text box you can enter the answer for the question written next to the text box.
5. Fill out the Quantitative Information tab and its subtabs, if this tab is available.
In this section you can fill the numeric fields regarding quantitative information about the project, such the number of reports, events, etc.
6. Fill out the Executive Summary tab.
In this section the beneficiary must enter the executive summary: a short description of the action/main objectives of the action and the key results.
7. Fill out the Signature tab.
In this section the beneficiary must sign the FTIR by filling out the declaration fields.
Once all sections of the final technical implementation report have been properly completed and the action closing date has been reached, the Report status on the top left side of the screen changes to Ready for Submission, meaning the technical implementation report is ready to be submitted, and the Submit button is enabled in the navigation bar:
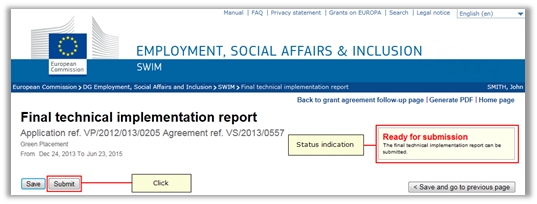
8. Upload Supporting Documents
Before submitting, supporting documents can be attached to the Final Technical Implementation Report and submitted together via SWIM. Documents can be uploaded while the FTIR is in editable status (Invalid draft report). Allowed extension files: .doc, .docx, .pdf, .xls, .xslx, .jpg, .jpeg, .png, .ppt, .pptx and .zip. Max size: 5mb
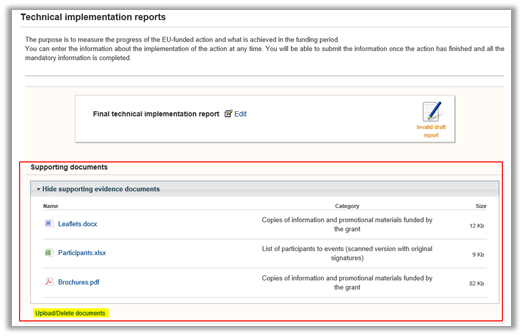
9. Click the Submit button in the FTIR.
The following confirmation message is displayed:
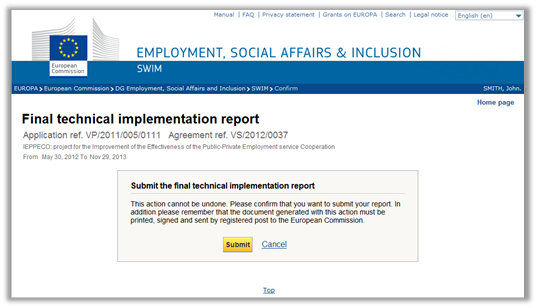
Attention: The report and the uploaded supporting documents cannot be edited anymore, once submitted.
10. Click the Submit button to confirm the submission.
The Grant agreement follow-up page is again displayed.
The Technical implementation report information section looks now as follows:
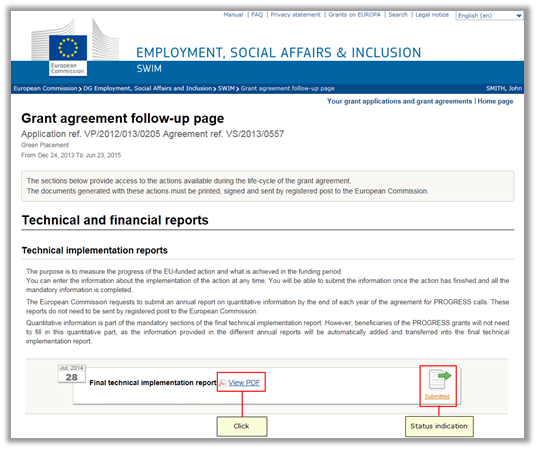
11. Click the View PDF link to open your final technical implementation report in PDF format.
Save the report on your local system and print it. Then sign the paper version in the Signature section and include it in the paper dossier you will send to the Commission together with the final financial statement and all other supporting documents that must be sent to the Commission at the end of the action.
The Commission may accept, ask for additional information or reject the final technical implementation report:
- If the Commission approves the final technical implementation report, the information displayed in the Technical implementation report section is not updated. It remains as displayed in the screenshot above.
- If the Commission requests additional information, you will be warned with an official letter. On the Grant agreement follow-up page, the Technical implementation reports section will look as follows:
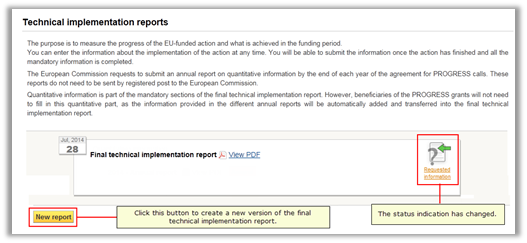
Click the New report button to create a new version of the report. The report will already contain the information you entered in the version for which the Commission requested additional information. You do not need to create the report from scratch. You will be able to update/upload/delete the supporting documents.
- If the Commission rejects the report, you will be warned with an official letter. On the Grant agreement follow-up page, the Technical implementation report section will look as follows:
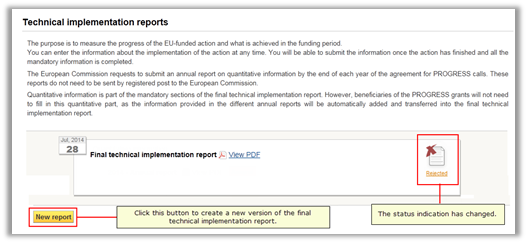
Click the New report button to create a new version of the report. The report will already contain the information you entered in the rejected version. You do not need to create the report from scratch. You will be able to update/upload/delete the supporting documents.
6.4. Filling out and submitting an annual report
For grants awarded under the PROGRESS programme, the Commission monitors the impact of PROGRESS-supported initiatives to examine how they contribute to the programme's objectives. In this context, as stated in the PROGRESS call for proposals, the Commission asks all beneficiaries to make available to the Commission and persons authorised by it all documents or information that will allow PROGRESS performance measurement to be successfully completed.
The beneficiary is therefore invited to complete each year covered by the grant a short quantitative questionnaire (called Annual report) on the outputs that have been produced under his grant agreement over the course of the current year.
If the grant covers several years, for instance 2013, 2014 and 2015 as in the example displayed below, you will have to submit an annual report for each year.
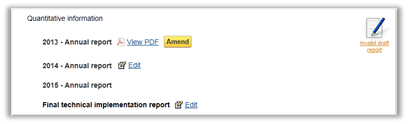
This screenshot was made in July 2014. As the annual reports must be submitted before January 15th of following year, the report for 2013 has already been submitted. For this report, you may:
Click the View PDF link to obtain the annual report in PDF format.
Click the Amend button to change the values for a submitted report. This button remains available, until you submit the Final technical implementation report.
The entry for 2014 is already accessible. Follow this procedure to edit the annual report for 2014:
1. Click the Edit link next to the 2014 Annual report.
The Annual report – 2014 page is displayed:

2. Click the Yes or No on the different subtabs representing the quantitative information categories.
If you select the No checkbox, no additional information is requested for that subtab:
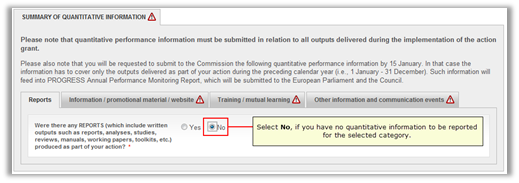
If you select the Yes checkbox, additional fields will be added to be filled out:
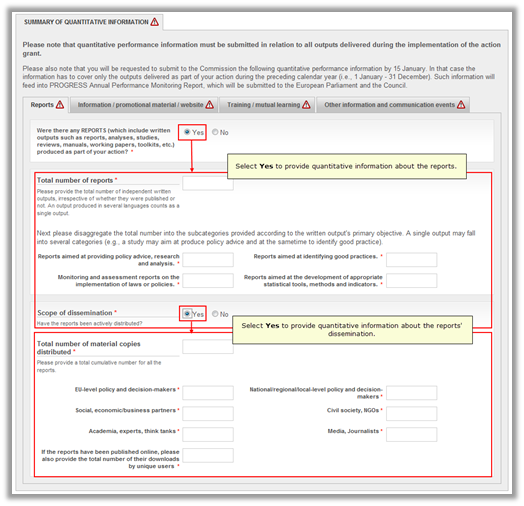
3. Fill out the subtabs as required.
Once the annual report is complete, the Annual report screen looks as follows:
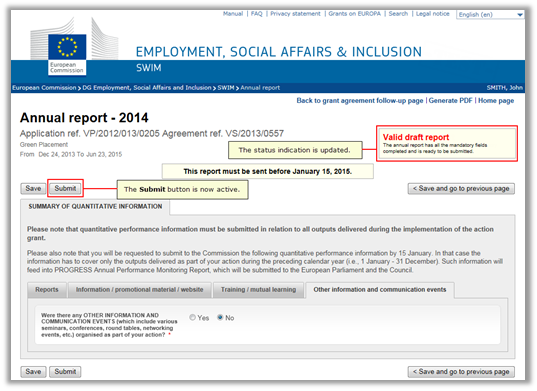
4. Click the Submit button.
The following confirmation message is displayed:
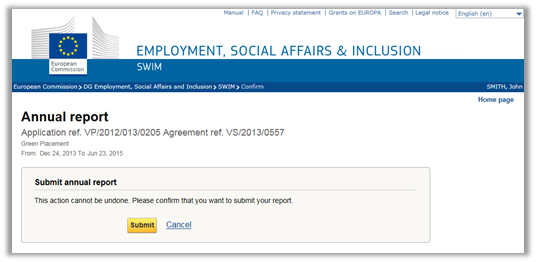
5. Click the Submit button.
In the Technical implementation report section, the submitted report is now displayed as follows:
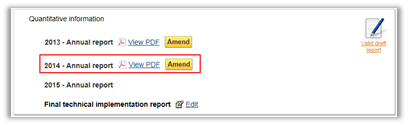
As for the other submitted annual reports, you can:
Create a PDF version
Amend the report, until the final technical implementation report is as well submitted.
6.5. Creating and submitting the final financial statement
At the end of the action, the beneficiary uses SWIM to create and submit the final financial statement of the eligible costs actually incurred in the implementation of the action. This statement must be sent to the Commission accompanying the request for the payment of the balance. Follow this procedure to create and submit the final financial statement:
1. Access the list of your grant applications and grant agreements.
Refer to Accessing the list of your grant applications and grant agreements.
The list of Your grant applications and grant agreements is displayed:
Note: If the grant agreement you are looking for is not available, you can add it to your list by asking a current editor to invite you as an editor as well, refer to Managing editors.
2. Click the title link matching the required grant agreement.
The Grant agreement follow-up page is displayed:
Note:
By default, this button becomes available after the action closing date. You may however ask the Commission to allow you to create your statement before this date. If the Commission agrees with this request, the button will become available.
3. Click the New statement button in the Final financial statement section.
The Final financial statement page is displayed:
These values are copied from the last approved budget version.
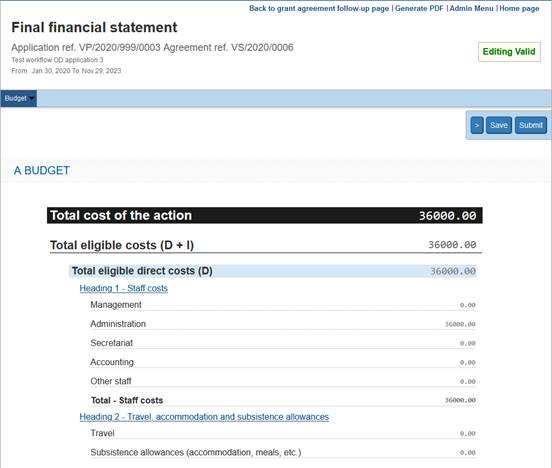
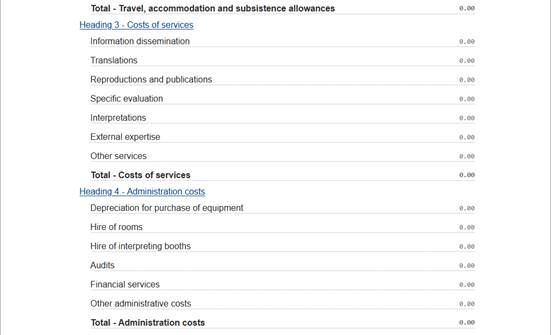
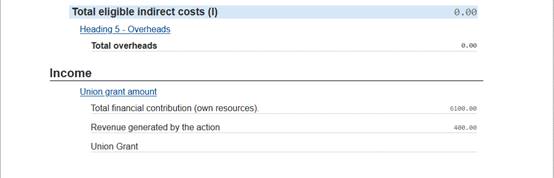
The system will display the estimated budget of the action as annexed to the grant agreement (or the last amendment, if available).
4. Click the different budget headings to edit the values so that they match the actual costs incurred in the implementation of the action.
You can enter comments for each modification.
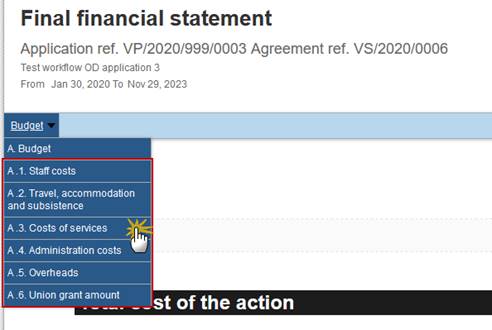
In the following example, the number of days was reduced for the last entry of the Hire of rooms costs, as indicated by the comment:

5. Edit the Overheads value, if this is required as a result of the values you corrected in the other budget sections.
The maximum allowable amount is displayed in the Overheads section. Only Action Grants can have up to a maximum flat-rate of 7% of Overheads of the total eligible direct costs:
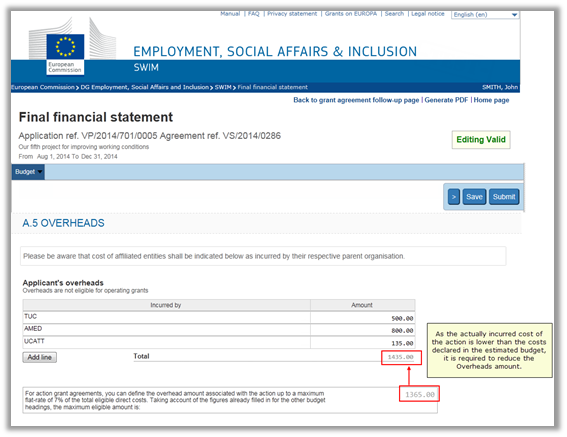
6. Reduce the overheads for one or several beneficiaries, so that the total overhead amount does not exceed the maximum amount anymore.
In the following example, the overhead amount was reduced for the AMED co-beneficiary, as the cost reduction (hire of rooms) was also on their behalf:
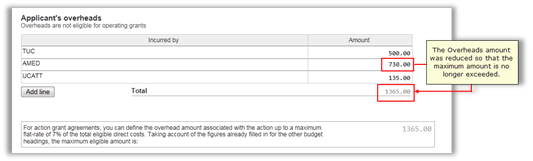
7. Access the Union Grant Amount section.

The Union Grant Amount section may now look as follows:
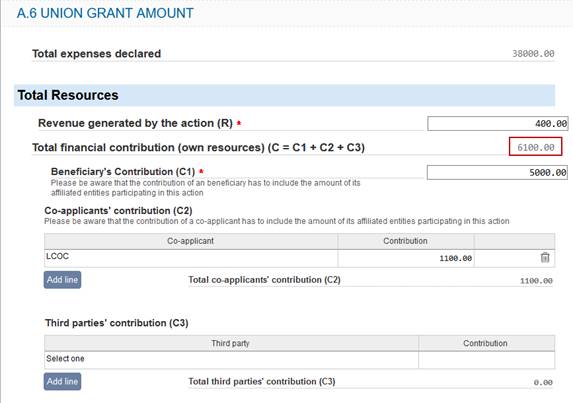
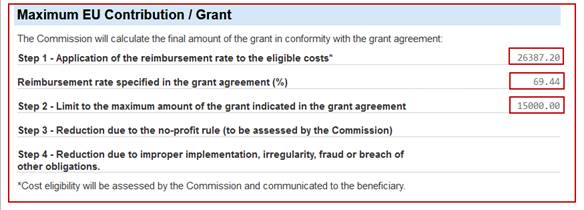
|
Remark |
The Final Union Grant amount doesn’t appear yet here because it has not yet been approved by the Commission. Only appears the limit to the maximum amount of the grant indicated in the grant agreement (Step 2). The final union grant will be assessed and communicated to you afterwards. The total financial contribution (own resources) are calculated automatically by the system. |
Explanation for the Maximum EU Contribution / Grant:
The effective union grant is limited to the lowest value of Step 1 and Step 2:
Step 1 – Application of the reimbursement rate to the eligible costs, in this example: 26387.20
|
Remark |
After you send this Final Financial Statement to the Commission, the financial unit will revise it and only the eligible/accepted costs are taking into account for the application of the reimbursement rate (Step 1). |
Step 2 – Limit to the maximum amount of the grant indicated in the grant agreement, in this case: 15000.00
Step 3 & Step 4 – These two Steps are not automatically calculated because it is the Financial Unit in the Commission which decides if they are applicable in the final computation of the Union Grant.
8. Regularly save your statement by clicking the Save button on the navigation bar.
The statement is saved by the system (but not yet submitted). On the Follow-up page, it will be displayed as follows in the Final financial statement section:
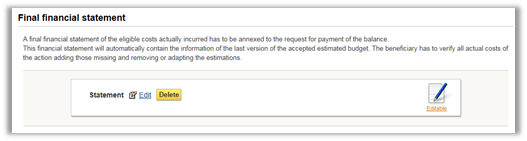
You may edit or delete the final financial statement, as long as it is not submitted.
9. Upload Supporting documents
Before clicking the submit button, you can attach supporting documents to your FFS and submit them together via SWIM. Documents can be uploaded while the FFS is in editable status. Allowed extension files: .doc, .docx, .pdf, .xls, .xslx, .jpg, .jpeg, .png, .ppt, .pptx and .zip. Max size: 5mb
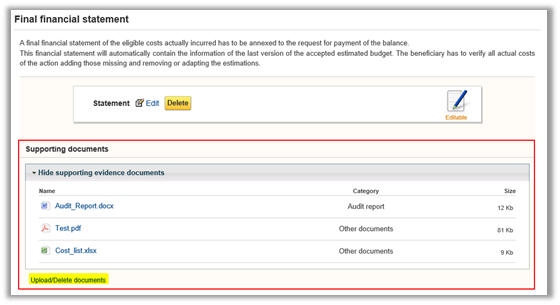
10. Click the Edit link to return to the Final financial statement page.
You can again edit the budget amounts.
11. Click the Submit button in the navigation bar, once you have performed all required changes to the budget and the status indication has changed to Valid:

The following confirmation message is displayed:
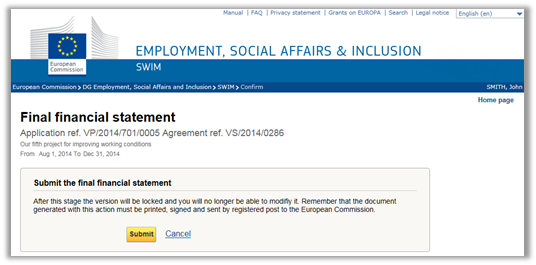
12. Click the Submit button.
The Grant agreement follow-up page is again displayed. The final financial statement is now displayed as follows:

The supporting documents are also sent to the EC and cannot be edited anymore.
13. Click the View PDF link and print the statement.
After being submitted electronically (at the latest, within 3 months after the closing date of the action), the final financial statement must also be printed out, signed by the legal representative and be sent by post to the responsible Unit, together with the other documents accompanying the request for the payment of the balance as specified in the grant agreement.
The final financial statement will be reviewed by the Commission in order to calculate the final grant. It can be accepted, modified or rejected. In all cases, the beneficiary will be officially informed by the responsible Unit.
If the final financial statement is rejected, the mention Rejected will be displayed:
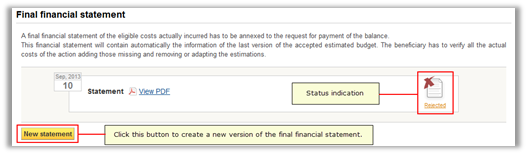
When you create a new final financial request, the starting values will match the ones from the rejected version, moreover you will be allowed to edit/delete/upload the supporting documents.